Why Use Tabs?
Enhanced UX
Create an intuitive, app-like experience that guides users naturally through your services
Better Organization
Separate different functionalities into logical sections for easier navigation
Higher Engagement
Users spend more time exploring features when they’re presented in an organized tab structure
Professional Look
Transform your widget from basic chat to a sophisticated customer portal
Quick Start
Tab Types Overview
- Home Tab
- Chats Tab
- FAQ Tab
The welcome center of your widget - your users’ first impression and primary navigation hub.
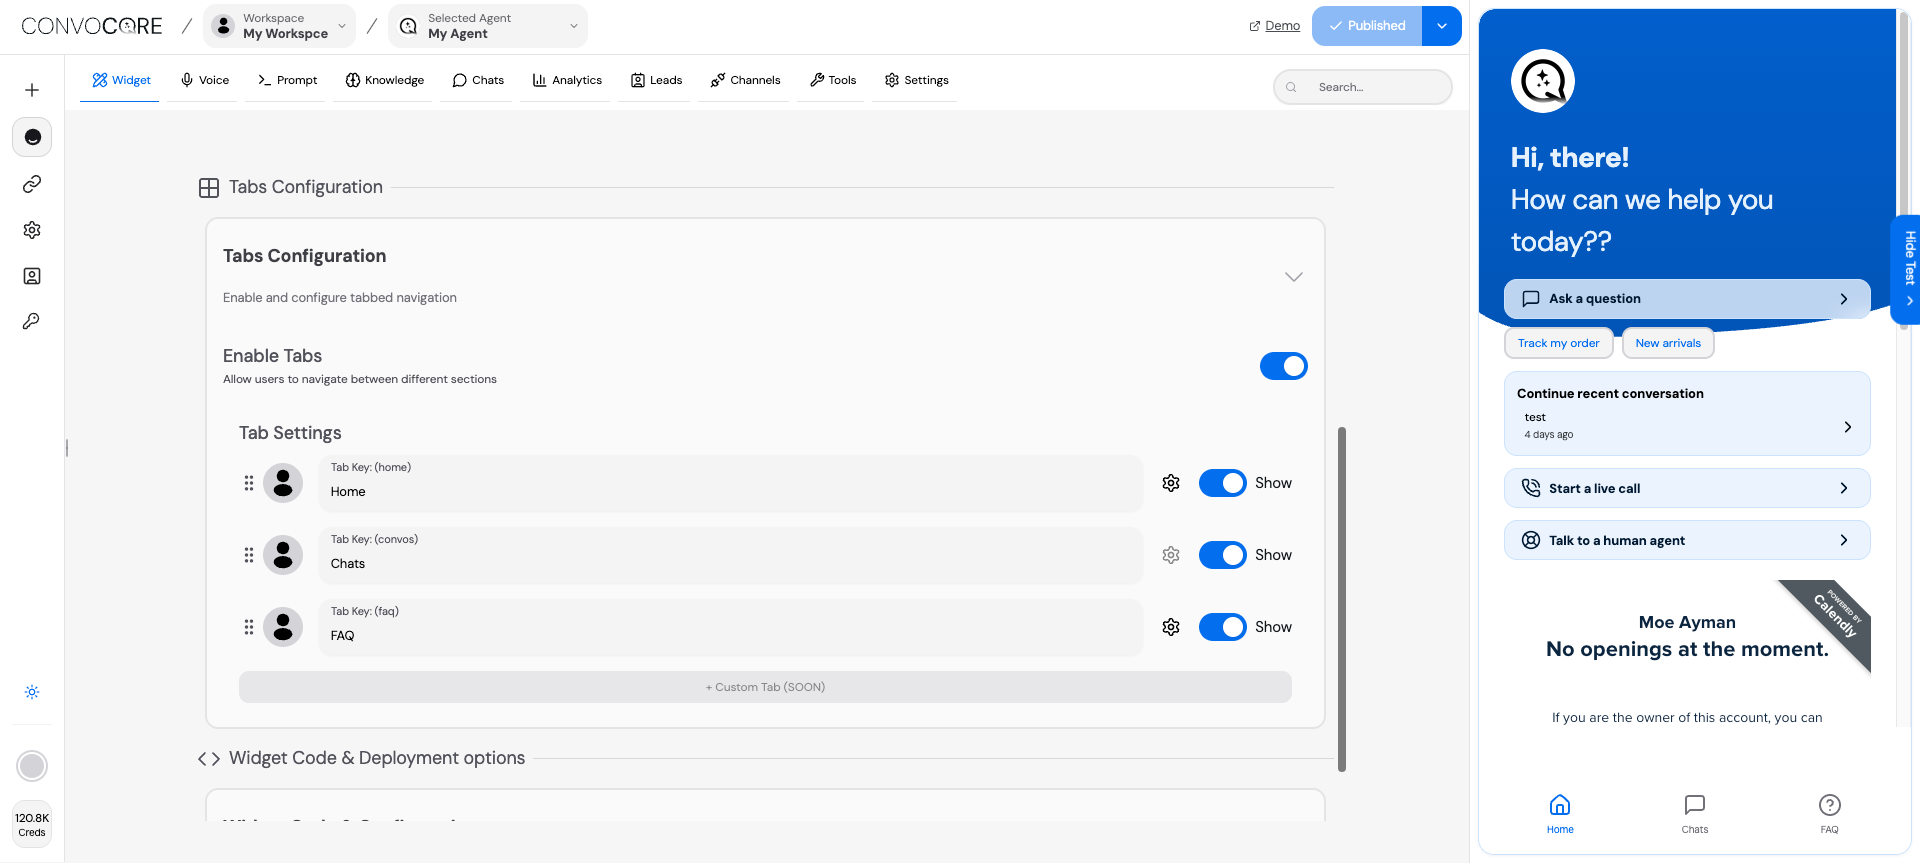
Custom Header Configuration
Custom Header Configuration
- Dynamic Greetings: Use variables like
{user.name}for personalization - Brand Messaging: Craft compelling descriptions that reflect your value proposition
- Visual Hierarchy: Control header height and spacing for optimal impact
Action Buttons Setup
Action Buttons Setup
Ice Breakers & Suggestions
Ice Breakers & Suggestions
Configure conversation starters that appear when users hover over buttons:
- “Track my order status”
- “Product recommendations”
- “Technical support”
- “Billing questions”
Configuration Walkthrough
Tab Reordering & Organization
Tab Reordering & Organization
Home Tab Deep Customization
Home Tab Deep Customization
- Header Setup
- Ice Breakers
Dynamic Variables Available:
{user.name}- User’s display name{user.email}- User’s email address{user.company}- Company name (if available)
FAQ Tab Configuration
FAQ Tab Configuration
- Content Management
- External Integration
Best Practices & Optimization
Design Excellence
Visual Hierarchy
- Use contrasting colors for CTAs
- Implement consistent spacing
- Choose readable font sizes
- Match your website’s color scheme
- Use your brand’s tone of voice
- Include brand-specific terminology
User Psychology
Cognitive Load
- Limit tabs to 3-4 maximum
- Use familiar terminology
- Provide clear visual cues
- Personalize greetings
- Use action-oriented language
- Create urgency when appropriate
Performance Metrics
Key Indicators
- Time spent per tab
- Button click rates
- FAQ search queries
- A/B test button labels
- Monitor drop-off points
- Refine based on analytics
Advanced Features
- Dynamic Personalization
- Integration & APIs
- Analytics & Insights
User Context Variables
User Context Variables
Variables automatically populate from user data when available, gracefully falling back to generic text when not.
Conditional Content Display
Conditional Content Display
- Time-based: Show different content based on business hours
- User tier: Display premium features for paid users
- Geographic: Adapt content based on user location
- Behavioral: Customize based on previous interactions
Troubleshooting Guide
Tabs Not Displaying
Tabs Not Displaying
Buttons Not Responding
Buttons Not Responding
FAQ Content Issues
FAQ Content Issues
- Content Not Showing
- External URL Problems
- Enable “Custom FAQ” toggle if using your own content
- Verify questions and answers are properly saved
- Check for special characters that might break formatting
Pro Tip: Most configuration changes take effect immediately, but some cached content may require up to 5 minutes to update globally. For immediate testing, use incognito mode or clear your browser cache.
What’s Next?
Theme Customization
Customize colors, fonts, and styling to match your brand perfectly
Widget Configuration
Advanced widget settings and behavioral customizations
Analytics Setup
Track user engagement and optimize your tab performance
Voice Integration
Add voice capabilities to enhance your tab interactions