Introduction
Connect your Shopify store to Convocore so your customers can check their order status and browse your products through your AI agent.Overview
The Shopify integration allows your customers to:- Check their order status by providing their order number
- View order details (items, shipping, total)
- Browse your store products and get product information
- See product availability and pricing
This integration is read-only for security. Your agent can help customers
view information but cannot modify orders or products in your store.
Prerequisites
Before connecting your Shopify store, you’ll need:- Admin access to your Shopify store
- Ability to create private apps in your Shopify admin
Step-by-Step Setup Guide
Step 1: Create a Shopify App
First, you’ll need to create a custom app in your Shopify admin to generate API credentials.- Go to your Shopify admin panel
- Navigate to Settings → Apps and sales channels
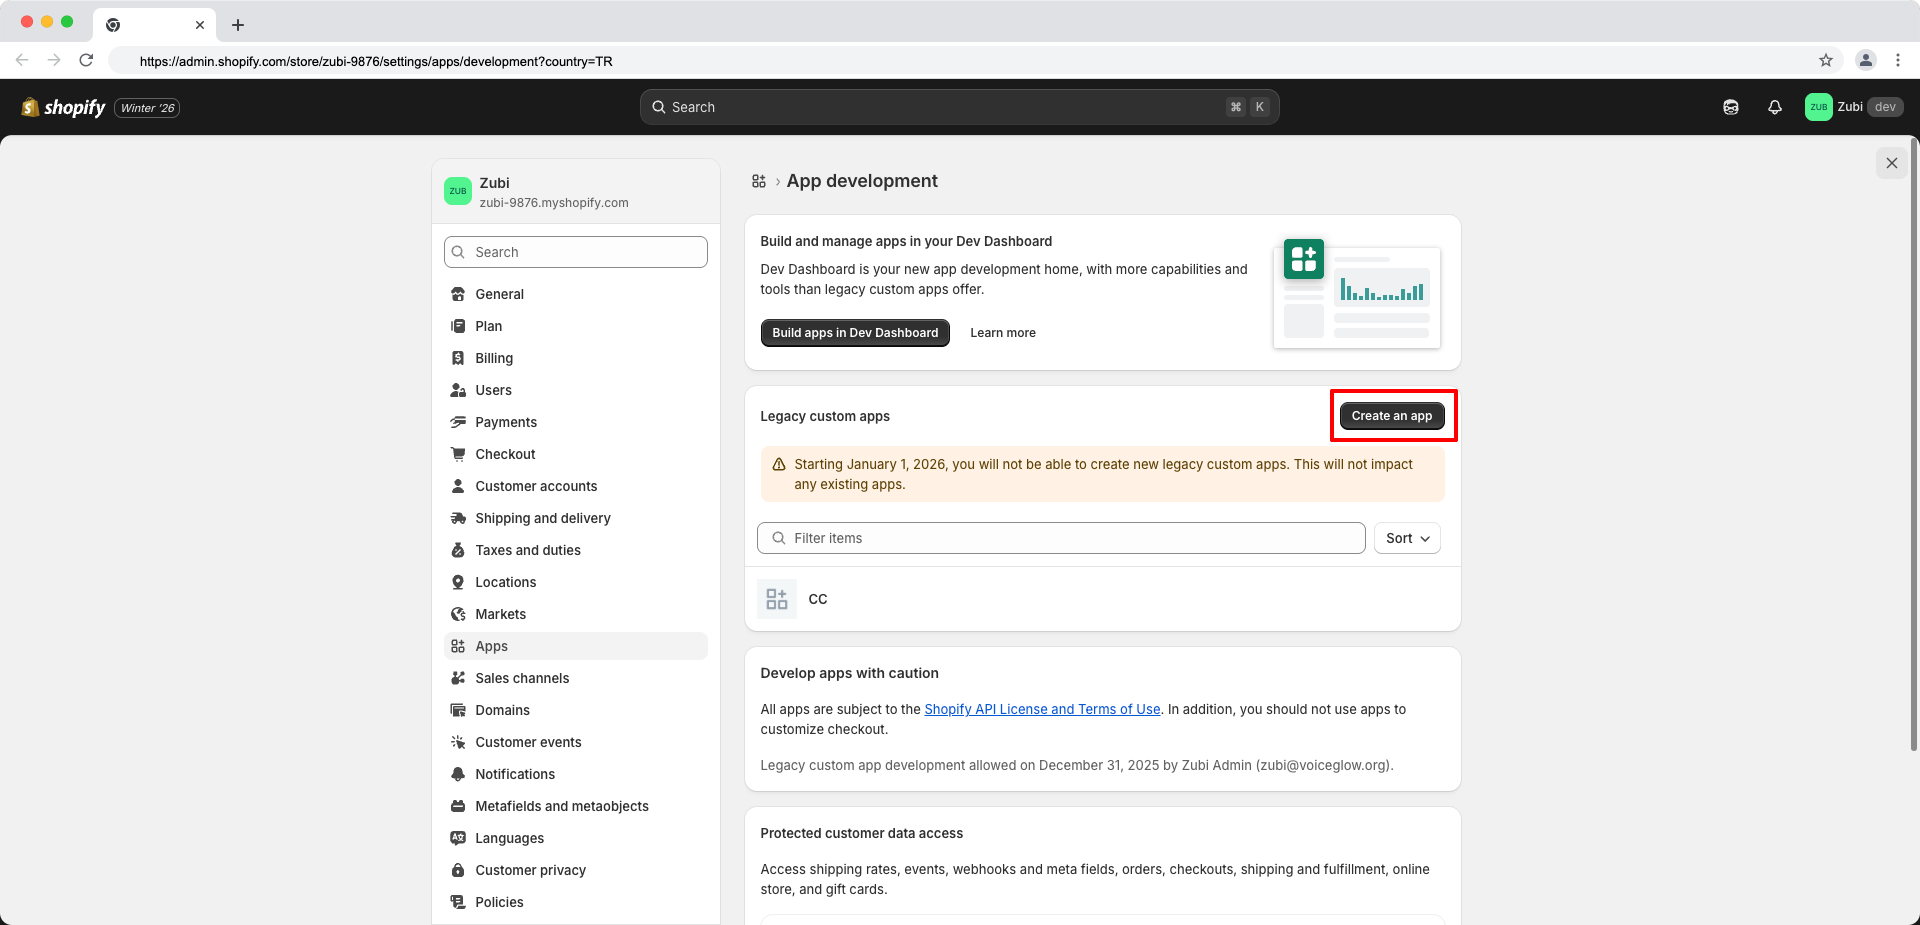
- Click “Develop apps” at the top right
- Click “Create an app”
- Give your app a name (e.g., “Convocore AI Assistant”)
The app name is just for your reference. Choose something descriptive like
“Customer Support Bot” or “AI Assistant Integration”.
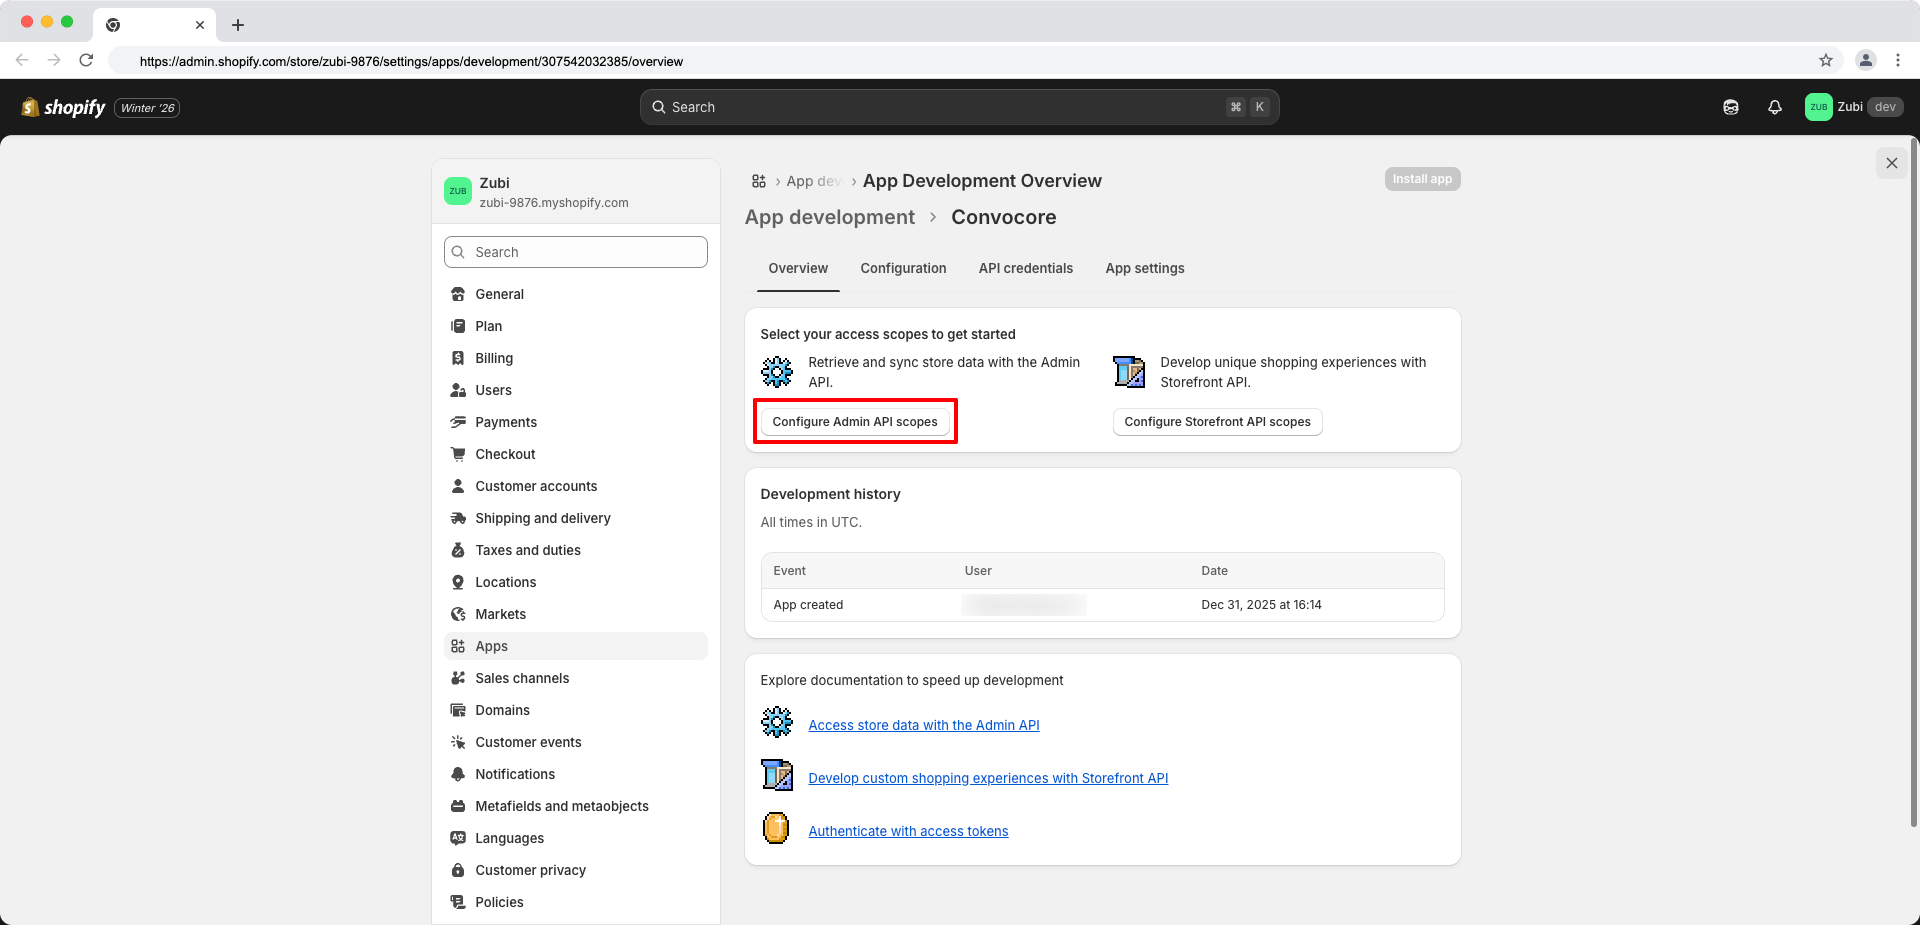
Step 2: Configure Admin API Scopes
After creating the app, you need to configure the API scopes to grant read access to orders and products.- Click “Configure Admin API scopes”
- Scroll through the available scopes
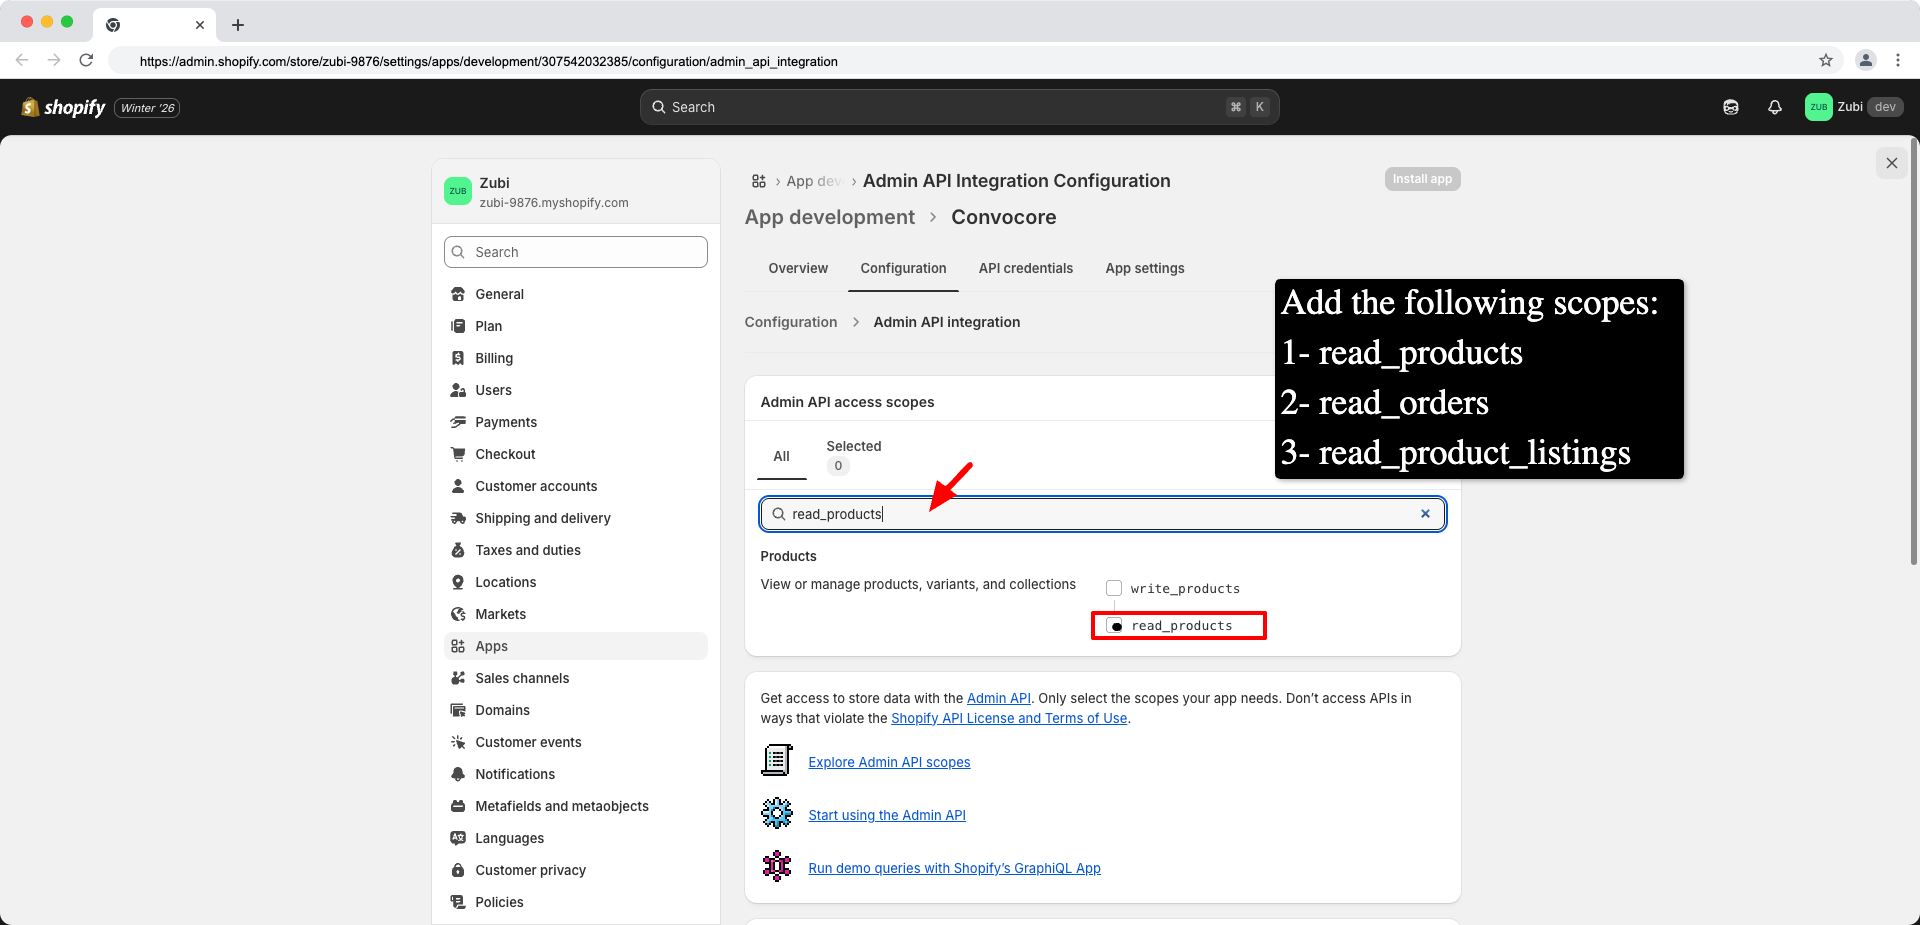
Step 3: Select Required Scopes
You need to enable exactly these three scopes for the integration to work:- ✅ read_orders - Allows viewing order information
- ✅ read_products - Allows viewing product data
- ✅ read_product_listings - Allows viewing published products
Step 4: Install the App
Once you’ve configured the scopes, you need to install the app to your store.- Click “Install app” button
- Confirm the installation when prompted
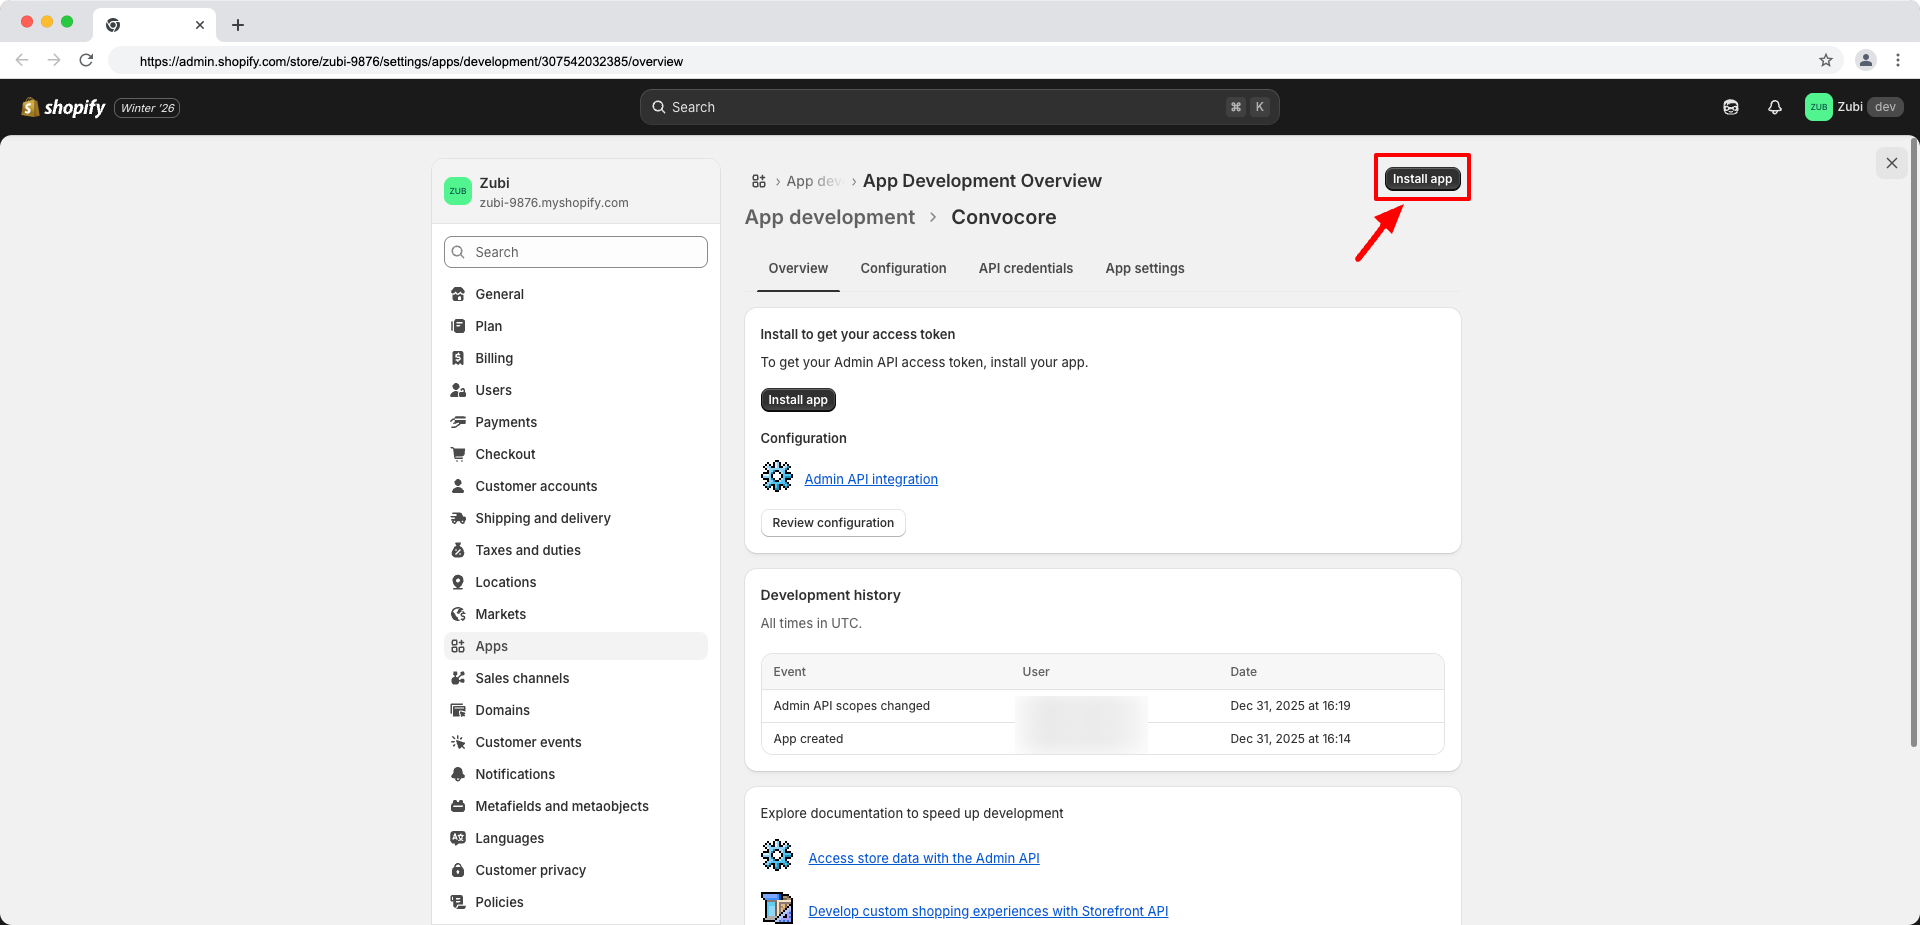
Installing the app generates your API credentials. This is a one-time setup
per store.
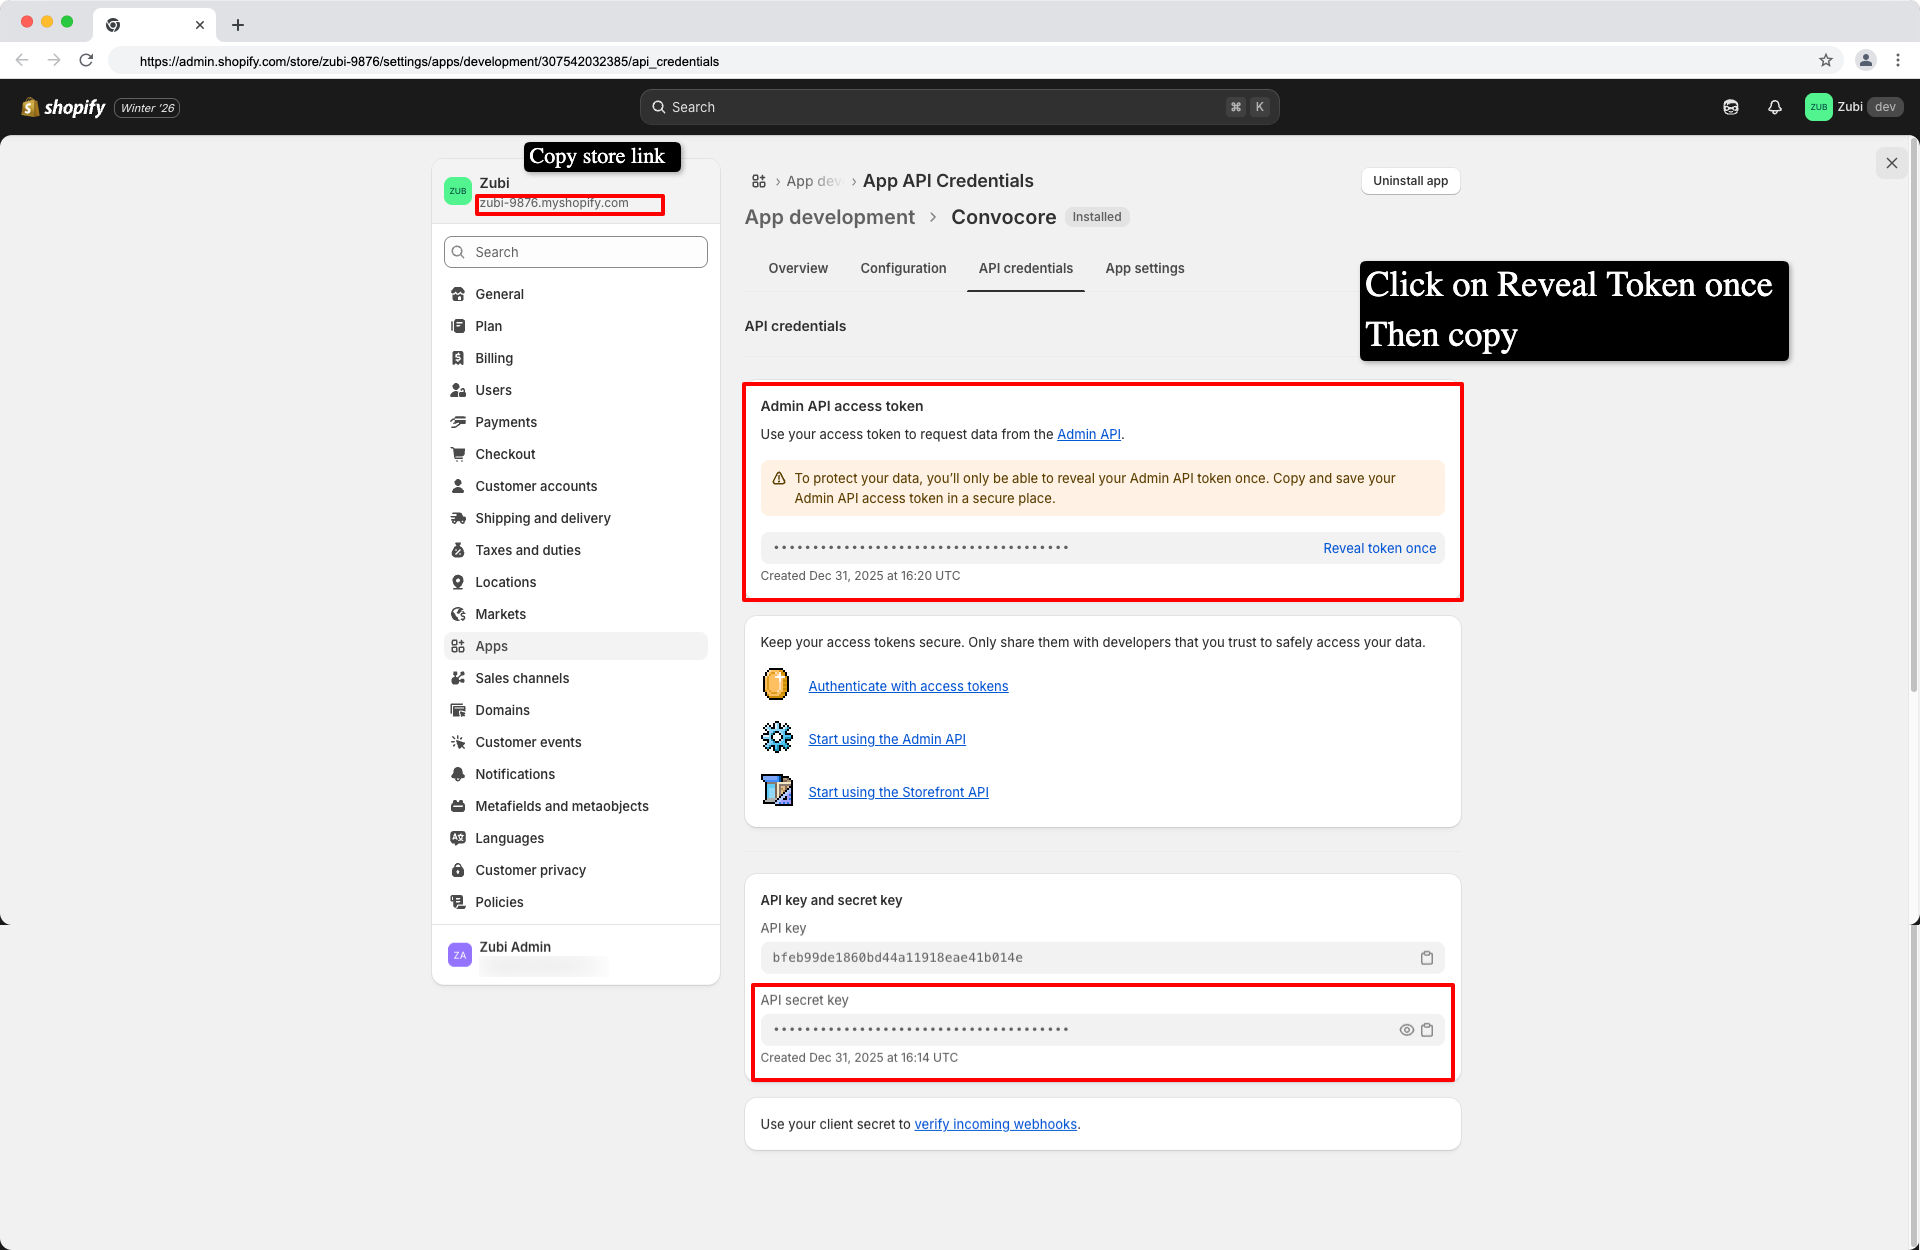
Step 5: Copy Your Credentials
After installation, you’ll see your API credentials. You need to copy two pieces of information:- Admin API access token (starts with
shpat_) - API secret key
Step 6: Connect to Convocore
Now you’re ready to connect your Shopify store to Convocore!- Go to the Integrations page in your Convocore dashboard
- Find the Shopify card and click “Connect”
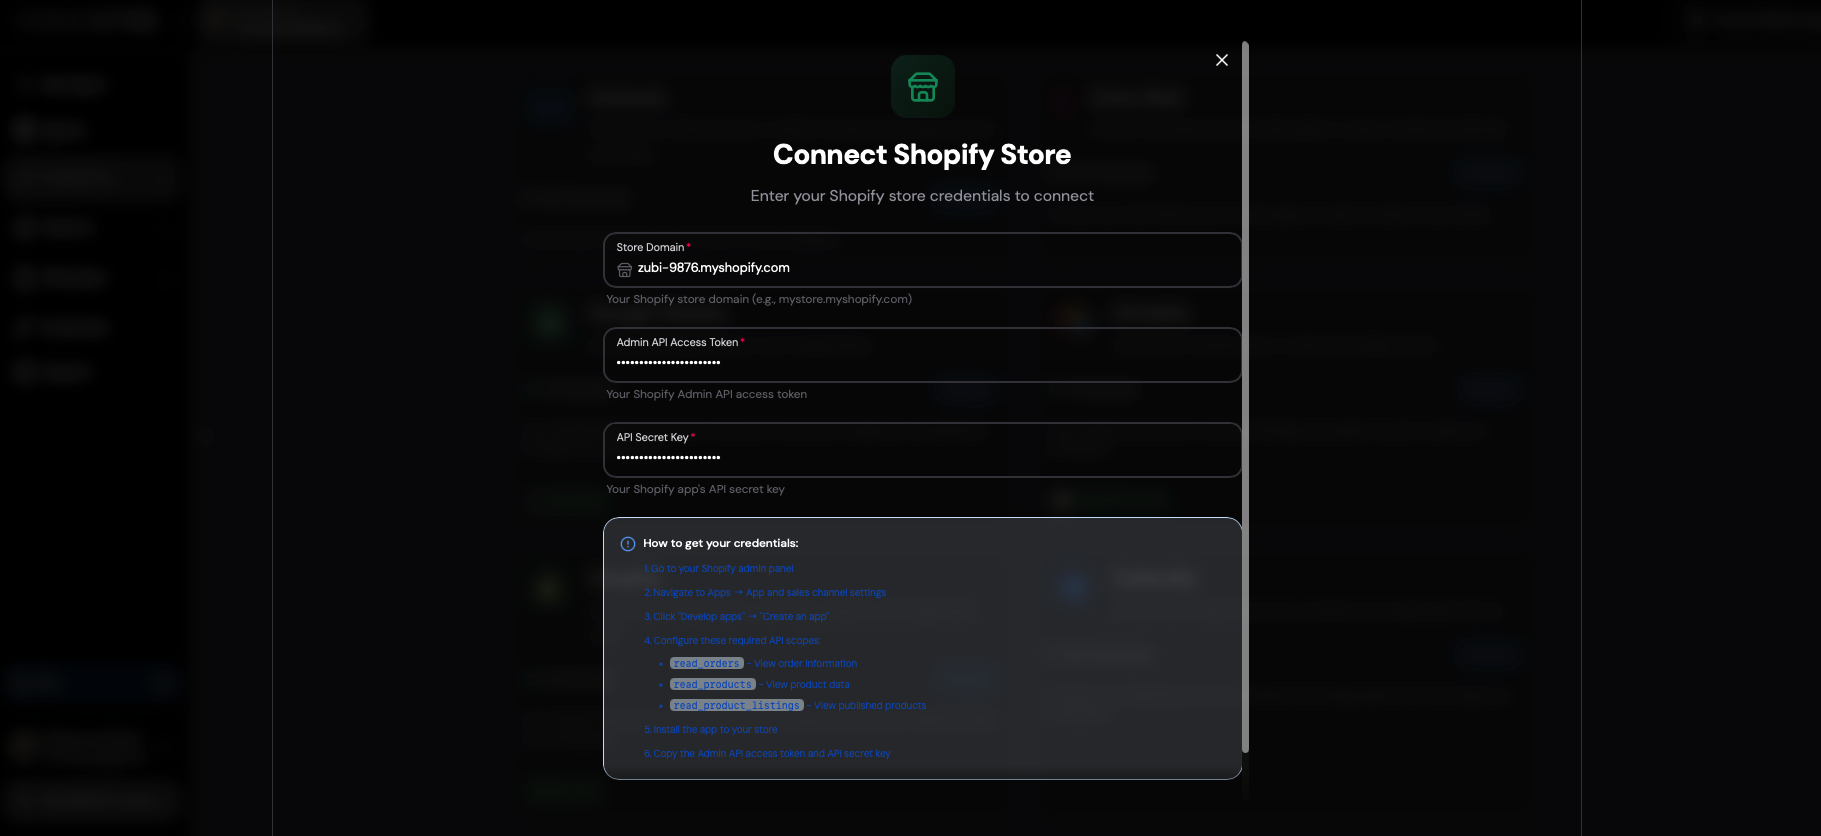
- Fill in the required information:
- Store Domain:
your-store.myshopify.com - Admin API Access Token:
shpat_xxxxxxxxxxxxx(from Step 5) - API Secret Key: Your app’s secret key (from Step 5)
- Store Domain:
- Click “Connect Store” to test and establish the connection
The system will automatically test your credentials before saving them. If you
see a success message, you’re all set!
Assigning to Agents
After connecting your Shopify store, you need to assign it to the agents that should have access.Method 1: Through Integrations Page
- Go to Integrations in your Convocore dashboard
- Find your connected Shopify store and click “Manage”
- Switch to the “Agent Assignment” tab
- Select the Shopify store you want to assign (if you have multiple)
- Choose one or more agents from the dropdown
- Click “Assign Shopify”
You can assign the same Shopify store to multiple agents, and each agent will
have read-only access to your store data.
Method 2: Through Agent Settings
- Go to the Agents tab and select your agent
- Navigate to the Canvas (or Nodes view)
- Edit a node (typically the Start Node)
- In the Tools section, find and enable the “Shopify” tool
- Save the node configuration
Agent Instructions
To help your agent understand when to use Shopify, add instructions like this to your agent’s prompt:What Your Customers Can Do
Once connected, your customers can interact with your agent to:Order Inquiries
- “What’s the status of my order #12345?”
- “When will my order arrive?”
- “What items are in my order?”
- “How much did I pay for my order?”
- “Has my order been shipped yet?”
Product Browsing
- “What products do you have?”
- “Tell me about [product name]”
- “How much does [product] cost?”
- “Do you have [product] in stock?”
- “Show me products in [category]“
Usage Examples
Customer Checking Order Status
Customer Asking About Products
Managing Your Integration
Viewing Connected Stores
- Go to Integrations in your dashboard
- Find the Shopify card - it will show “X Connections” if connected
- Click “Manage” to see all connected stores
Managing Agent Assignments
In the Manage modal, you’ll see two tabs: Store Connections Tab:- View all connected Shopify stores
- See store details (domain, currency, timezone)
- Disconnect stores when needed
- See which agents are using Shopify
- Assign Shopify to new agents
- Remove Shopify from agents
Disconnecting a Store
If you need to disconnect a Shopify store:- Go to Integrations → Shopify → “Manage”
- Go to “Store Connections” tab
- Find the store you want to disconnect
- Click the store to expand details
- Click “Disconnect” and confirm
Tips for Better Customer Experience
Helpful Agent Prompts
To make your agent more effective with Shopify integration, consider adding these suggestions to your agent’s system prompt:System Prompt Addition
Common Customer Questions
Your agent will be able to handle questions like:- “What’s the status of order #12345?”
- “When will my order arrive?”
- “Do you have [product] in stock?”
- “How much does [product] cost?”
- “What products do you have in [category]?”
- “Can you help me find [type of product]?”
Troubleshooting
Connection Issues
Problem: “Invalid access token or unauthorized” Solutions:- Verify your access token starts with
shpat_ - Check that your app is installed to your store
- Ensure API scopes are configured correctly (all 3 scopes)
- Try regenerating the access token in Shopify
- Verify your store domain includes
.myshopify.com - Check for typos in the domain name
- Ensure the store is active and accessible
- Go back to Shopify and verify all 3 API scopes are enabled
- Make sure the app is installed to your store
- Try uninstalling and reinstalling the app
Agent Can’t Find Orders
Problem: Customer provides order number but agent says “order not found” Solutions:- Ask customer to double-check their order number
- Verify you’re connected to the correct Shopify store
- Check that the
read_ordersscope is enabled - Order might be very old (system searches recent orders first)
Agent Not Responding to Shopify Questions
Problem: Agent doesn’t use Shopify when customers ask about orders/products Solutions:- Make sure Shopify is assigned to the agent (check in Integrations → Manage → Agent Assignment)
- Verify the Shopify tool is enabled in your agent’s node settings
- Check that your store connection shows as “Connected” in Integrations
- Add clearer instructions in your agent’s prompt about using Shopify
- Try reconnecting your store if issues persist
Error Messages
If you see error messages when connecting:| Error Message | What It Means | Solution |
|---|---|---|
| ”Invalid access token” | The access token is incorrect | Copy the token again from Shopify |
| ”Store not found” | Domain is incorrect | Check your .myshopify.com domain |
| ”Access forbidden” | Missing API scopes | Add all 3 required scopes |
| ”Connection test failed” | Network or API issue | Try again in a few moments |
Security & Privacy
Your data security is our top priority:- ✅ Read-only access - Cannot modify your store data or process orders
- ✅ Secure storage - API credentials are encrypted at rest
- ✅ HTTPS only - All API calls use secure SSL connections
- ✅ No data retention - Order and customer data is not stored by Convocore
- ✅ Disconnect anytime - Remove access instantly from Integrations page
- ✅ Scoped permissions - Only requests the minimum required access
Your Shopify credentials are never exposed to end users or stored in logs.
They are only used server-side to make authenticated API requests to your
store.
Advanced Configuration
Multiple Store Support
You can connect multiple Shopify stores to your workspace:- Each store gets its own connection in Integrations
- Each agent can be assigned to one or more stores
- Agents will search across all assigned stores when helping customers
Custom Agent Behaviors
You can customize how your agent uses Shopify by: In Agent Prompt:Support
Need help? Here’s what to check:- Connection Status - Verify your store shows as “Connected” (green indicator) in Integrations
- Agent Assignment - Make sure Shopify is assigned to your agent via Integrations → Manage
- Test Connection - The system tests your credentials automatically when connecting
- Check Scopes - All 3 API scopes must be enabled in your Shopify app
Quick Start Checklist
- Create Shopify app in your admin panel
- Configure the 3 required API scopes
- Install the app to your store
- Copy Admin API access token and secret
- Connect store in Convocore Integrations
- Assign Shopify to your agent(s)
- Add helpful instructions to agent prompt
- Test with sample customer questions