> ## Documentation Index
> Fetch the complete documentation index at: https://docs.convocore.ai/llms.txt
> Use this file to discover all available pages before exploring further.
# Creating Users
> Add client users, assign access, and invite them into the whitelabel dashboard.
Adding users to a client organization is how you give real people access to the client-facing dashboard. Each user can have a different permission set depending on what they need to manage.
## Open user management
Open the `Clients` section in your whitelabel dashboard.
Choose the client organization you want to manage.
Click `Manage` to access the organization's users and settings.
New organizations start with an empty user list. After adding users, you can organize them into [teams](/whitelabeling/clients/managing-teams) if your workflow requires handoff or collaboration.
If you need the full hierarchy explained in one place, including workspace-side admins, org admins, client users, logs, and KB history, see [Access, Roles, and Activity Logs](/whitelabeling/clients/access-and-roles).
 ## Add a user
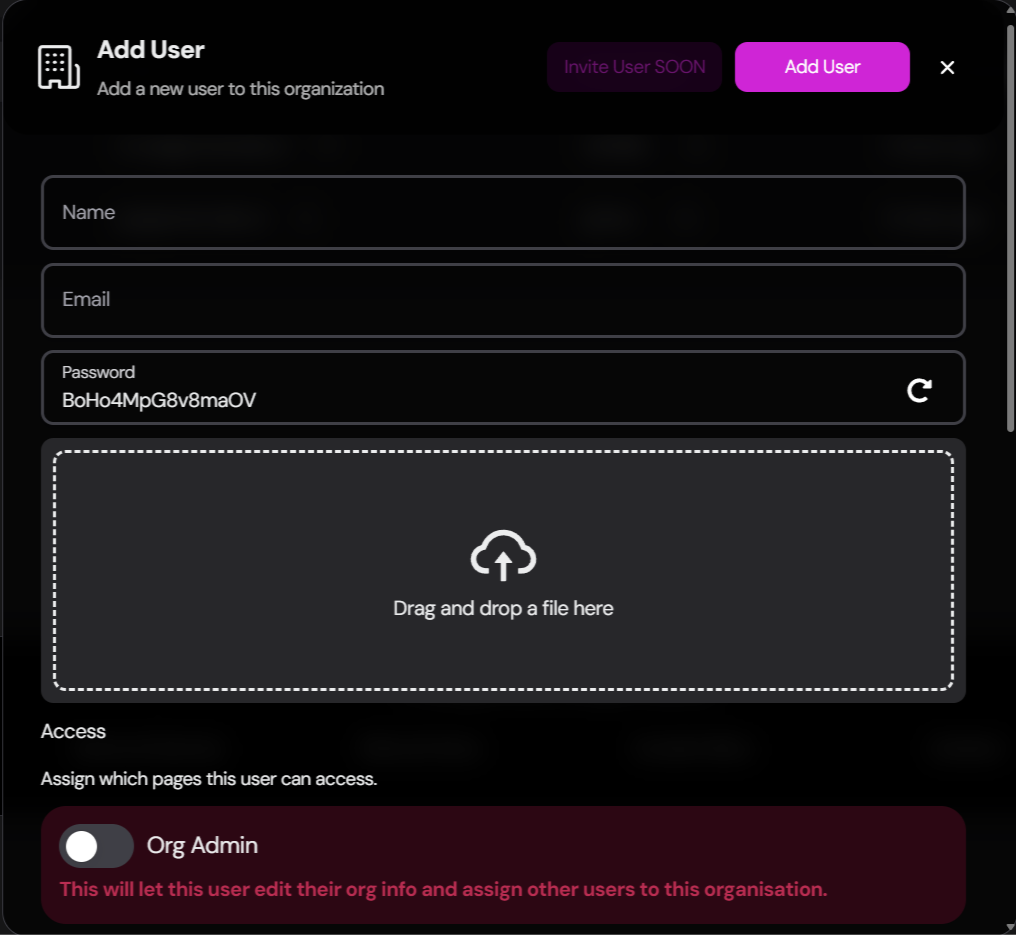
Use the `Add User` button in the top-right corner of the user management view.
Add the user's full name, email address, password, and optional profile image.
Double-check the email address before saving. This is the account the client will use for login and invitations.
Decide what this user should be able to see and manage inside the client dashboard.
Click `Add User` to create the account.
## Add a user
Use the `Add User` button in the top-right corner of the user management view.
Add the user's full name, email address, password, and optional profile image.
Double-check the email address before saving. This is the account the client will use for login and invitations.
Decide what this user should be able to see and manage inside the client dashboard.
Click `Add User` to create the account.
 ## Permission overview
These permissions control what the user can do inside the client dashboard:
* `Org Admin`: Can edit organization details and manage other users in the same organization
* `Home`: Access the overview and dashboard landing experience
* `Conversations`: View conversation history and manage transcripts
* `Analytics`: Access performance reporting and usage-related views
* `Knowledge Base`: View and update KB documents
* `Channels`: Manage channel connections and channel-level settings
* `Prompt`: Edit prompts, model choices, tools, UI behavior, and related agent settings
* `Settings`: Access the agent settings exposed to the client dashboard
* `Custom Tab`: Access agency-created tabs configured through [Custom Tabs](/whitelabeling/agency/custom-tabs)
`Org Admin` is a client-organization role. It is separate from workspace owner or workspace admin access in the main Convocore app.
The available areas depend on how your agency has configured the dashboard and plan limits. For a user-friendly overview of the client experience, see [Client Dashboard Features](/whitelabeling/clients/client-dashboard/features).
## Invite the user
After the user is created, send them access to the dashboard:
Use the `Log in` option first if you want to preview the dashboard from the client's perspective.
Locate the user in the organization's user table.
Click `Invite` to send the login email.
Verify the details and send the invitation.
The invitation email includes a login link for the client dashboard. Make sure the email address is correct before sending it.
## Manage existing users
Open the user row, click `Edit`, update the profile or permissions, and save your changes.
Removing a user deletes their access to the client dashboard. Review carefully before confirming deletion.
Users can reset their own password from the client login screen using `Forgot password`. The reset email is branded using the whitelabel email setup for that client environment.
## Best practices
Give the first trusted contact administrative access so they can help manage their own team.
Only grant the sections the user actually needs to keep the dashboard simple and secure.
Review users and permissions periodically, especially after team changes.
Tell clients which pages they can access and who to contact if they need broader permissions.
## Related documentation
Review the full role model, including workspace-side roles and activity logs.
Learn how organizations, assigned agents, and org settings fit together.
Organize client users for support, handoff, and collaboration.
Understand the client-facing areas users can access.
Learn how billing interacts with organizations, plans, and subscriptions.
## Permission overview
These permissions control what the user can do inside the client dashboard:
* `Org Admin`: Can edit organization details and manage other users in the same organization
* `Home`: Access the overview and dashboard landing experience
* `Conversations`: View conversation history and manage transcripts
* `Analytics`: Access performance reporting and usage-related views
* `Knowledge Base`: View and update KB documents
* `Channels`: Manage channel connections and channel-level settings
* `Prompt`: Edit prompts, model choices, tools, UI behavior, and related agent settings
* `Settings`: Access the agent settings exposed to the client dashboard
* `Custom Tab`: Access agency-created tabs configured through [Custom Tabs](/whitelabeling/agency/custom-tabs)
`Org Admin` is a client-organization role. It is separate from workspace owner or workspace admin access in the main Convocore app.
The available areas depend on how your agency has configured the dashboard and plan limits. For a user-friendly overview of the client experience, see [Client Dashboard Features](/whitelabeling/clients/client-dashboard/features).
## Invite the user
After the user is created, send them access to the dashboard:
Use the `Log in` option first if you want to preview the dashboard from the client's perspective.
Locate the user in the organization's user table.
Click `Invite` to send the login email.
Verify the details and send the invitation.
The invitation email includes a login link for the client dashboard. Make sure the email address is correct before sending it.
## Manage existing users
Open the user row, click `Edit`, update the profile or permissions, and save your changes.
Removing a user deletes their access to the client dashboard. Review carefully before confirming deletion.
Users can reset their own password from the client login screen using `Forgot password`. The reset email is branded using the whitelabel email setup for that client environment.
## Best practices
Give the first trusted contact administrative access so they can help manage their own team.
Only grant the sections the user actually needs to keep the dashboard simple and secure.
Review users and permissions periodically, especially after team changes.
Tell clients which pages they can access and who to contact if they need broader permissions.
## Related documentation
Review the full role model, including workspace-side roles and activity logs.
Learn how organizations, assigned agents, and org settings fit together.
Organize client users for support, handoff, and collaboration.
Understand the client-facing areas users can access.
Learn how billing interacts with organizations, plans, and subscriptions.