> ## Documentation Index
> Fetch the complete documentation index at: https://docs.convocore.ai/llms.txt
> Use this file to discover all available pages before exploring further.
# Configure Email Routing
Configuring a custom email domain ensures your brand consistency extends beyond the URL to client communications. Whether it's important notifications or login invitations, your branding remains front and center throughout the client experience.
 A custom email domain reinforces your professional image and enhances client trust.
## Setup Process
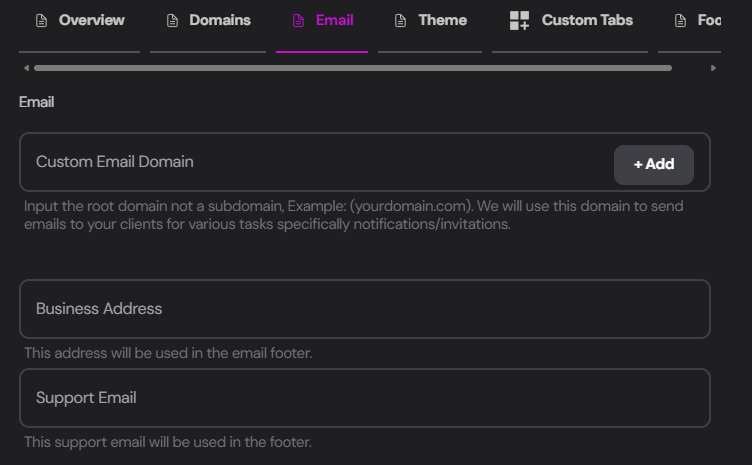
Input your domain in the `Custom Email Domain` field and click `+ Add`.
Enter only the domain (e.g., yourdomain.com) without any protocol (https\://). For example, we added **convocore.ai**
You'll be prompted to add three DNS records to your provider:
A custom email domain reinforces your professional image and enhances client trust.
## Setup Process
Input your domain in the `Custom Email Domain` field and click `+ Add`.
Enter only the domain (e.g., yourdomain.com) without any protocol (https\://). For example, we added **convocore.ai**
You'll be prompted to add three DNS records to your provider:
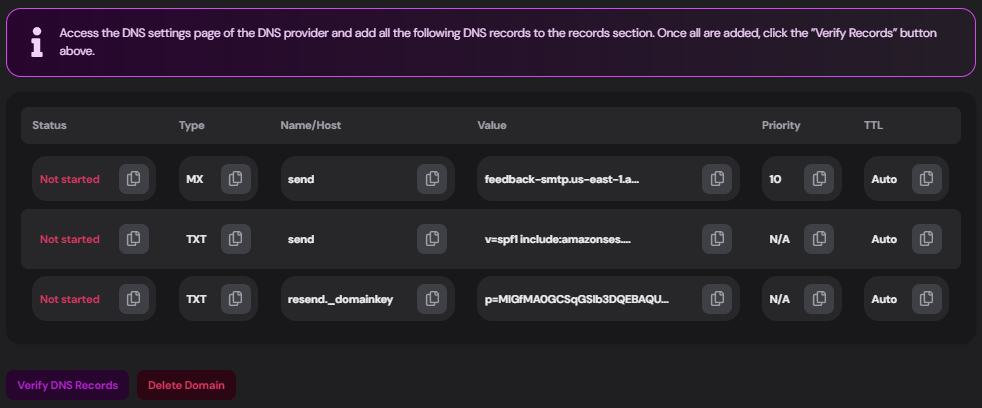 Access your DNS settings from your provider (e.g., [Godaddy.com](https://godaddy.com)) and add the following records (**keep in mind:** Your records will differ):
```plaintext theme={null}
Type: MX
Name/Host: send
Value: feedback-smtp.us-east-1.amazonses.com
Priority: 10
TTL: Auto
```
```plaintext theme={null}
Type: TXT
Name/Host: send
Value: v=spf1 include:amazonses.com ~all
Priority: N/A
TTL: Auto
```
```plaintext theme={null}
Type: TXT
Name/Host: resend._domainkey
Value: p=MIGMAOGGSP[...]
Priority: N/A
TTL: Auto
```
After adding the records to your provider, click `Verify DNS Records`.
If you need to start over, use the `Delete Domain` button to reset the process.
Once correctly set up, you can send notifications and invites directly from your **own** email domain!
## Additional Email Settings
From the Email tab, you can also configure:
Enter your agency's physical address to be included in the emails footer sent from your dashboard.
Add your agency's dedicated support email, which will also appear in the emails footer.
Advanced email-related capabilities may continue to expand over time. If you need help with your current email setup or rollout, contact [support@convocore.ai](mailto:support@convocore.ai).
Access your DNS settings from your provider (e.g., [Godaddy.com](https://godaddy.com)) and add the following records (**keep in mind:** Your records will differ):
```plaintext theme={null}
Type: MX
Name/Host: send
Value: feedback-smtp.us-east-1.amazonses.com
Priority: 10
TTL: Auto
```
```plaintext theme={null}
Type: TXT
Name/Host: send
Value: v=spf1 include:amazonses.com ~all
Priority: N/A
TTL: Auto
```
```plaintext theme={null}
Type: TXT
Name/Host: resend._domainkey
Value: p=MIGMAOGGSP[...]
Priority: N/A
TTL: Auto
```
After adding the records to your provider, click `Verify DNS Records`.
If you need to start over, use the `Delete Domain` button to reset the process.
Once correctly set up, you can send notifications and invites directly from your **own** email domain!
## Additional Email Settings
From the Email tab, you can also configure:
Enter your agency's physical address to be included in the emails footer sent from your dashboard.
Add your agency's dedicated support email, which will also appear in the emails footer.
Advanced email-related capabilities may continue to expand over time. If you need help with your current email setup or rollout, contact [support@convocore.ai](mailto:support@convocore.ai).