> ## Documentation Index
> Fetch the complete documentation index at: https://docs.convocore.ai/llms.txt
> Use this file to discover all available pages before exploring further.
# Adding a SIP Provider
> Detailed guide on configuring and managing SIP providers
# Adding and Managing SIP Providers
A SIP provider (also called a SIP trunk) is your connection to the telephone network. This guide covers everything you need to know about adding and managing SIP providers in Convocore.
## Understanding SIP Providers
A SIP provider is the service that supplies you with phone numbers and connects your calls to the public telephone network. Think of it as your "phone company" for internet-based calling.
### What is a SIP Trunk?
A SIP trunk is a virtual phone line that uses your internet connection instead of traditional copper wires. It allows you to:
* Make and receive phone calls over the internet
* Use multiple phone numbers on the same connection
* Scale up or down without physical infrastructure changes
* Reduce costs compared to traditional phone lines
## Before You Begin
Select a SIP trunk provider that fits your needs. Popular options include:
* **Twilio**: Best for developers, extensive API
* **Peoplefone**: European telecommunication provider. Since its founding in Switzerland
Collect the following from your SIP provider:
* SIP domain/hostname (e.g., `sip.provider.com`)
* Port number (usually 5060 for UDP or 5061 for TLS)
* Authentication credentials (username and password) (Optional)
* Any IP restrictions or firewall requirements
Set up your SIP provider to route calls to the Convocore SIP server:
* IP Address: `134.209.121.168`
* Port: `5060`
## Adding a New SIP Provider
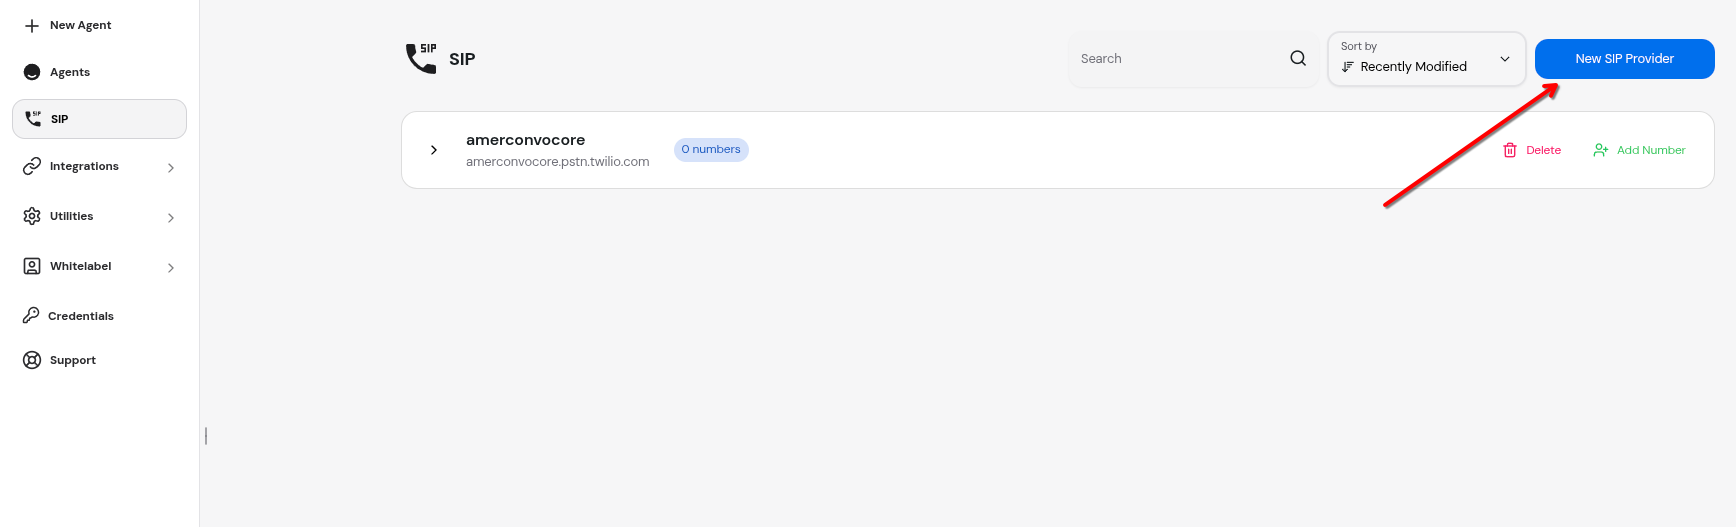
### Step 1: Open the Import Dialog
Navigate to the SIP section in your Convocore dashboard and click the **"+ New SIP Provider"** button.
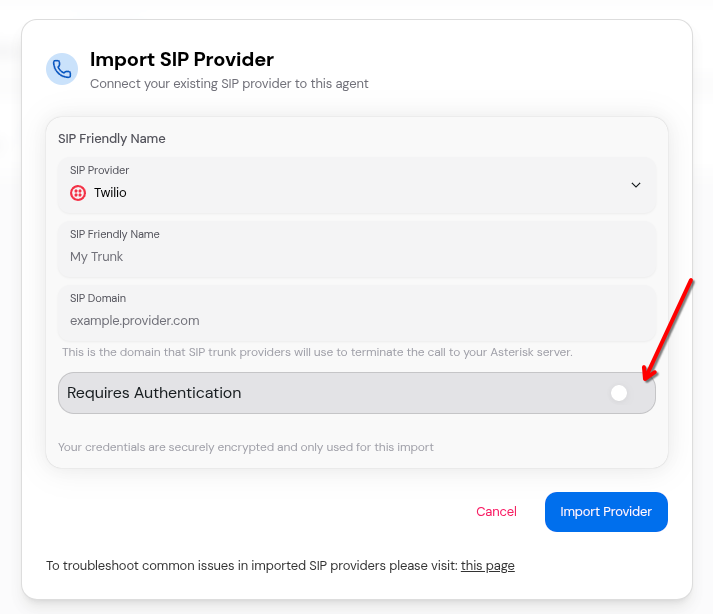
 ### Step 2: Enter Provider Details
The import dialog will appear with the following fields:
### Step 2: Enter Provider Details
The import dialog will appear with the following fields:
 #### Required Fields
**Friendly Name**
A descriptive name for this SIP trunk. This is for management purposes only and won't affect the connection
but it has to be unique.
Examples:
* "Main Customer Support Line"
* "Sales Team Hotline"
* "Twilio Production Trunk"
* "Office PBX"
**SIP Domain**
The domain or hostname of your SIP provider. This is where the Asterisk server will send and receive SIP signaling.
Examples:
* `sip.twilio.com`
* `sip.provider.com`
* `192.168.1.100` (for local PBX)
* `my-company.sip.vonage.com`
Do NOT include `sip:` prefix or port numbers. Just the hostname or IP
address.
#### Authentication Settings
**Requires Authentication** Toggle this ON if your SIP provider requires
username and password authentication. Most commercial providers require this
for security. When enabled, two additional fields appear:
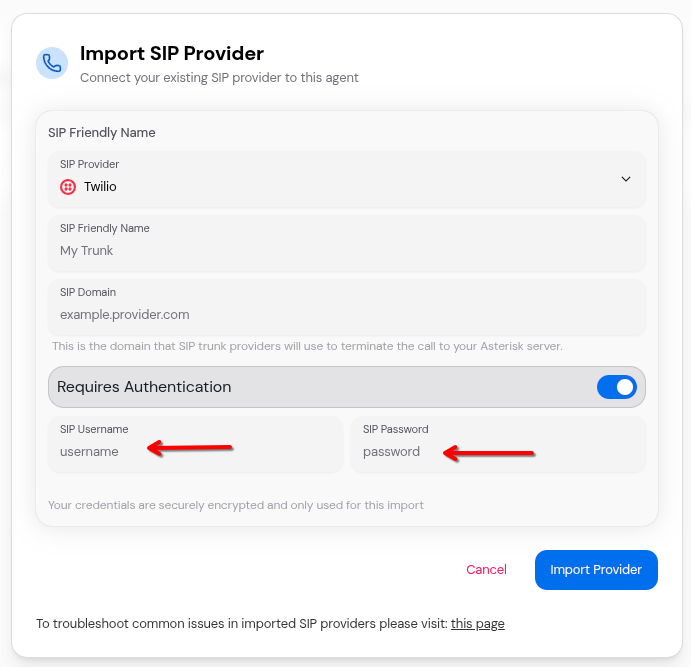
**SIP Username**
The username provided by your SIP provider for authentication. Sometimes called:
* Auth username
* SIP user
* Trunk username
* Account ID
**SIP Password**
The password provided by your SIP provider. Also known as:
* Auth password
* SIP password
* Trunk password
* Auth token
Your password is encrypted and securely stored. It's never displayed in
plain text after saving.
#### Required Fields
**Friendly Name**
A descriptive name for this SIP trunk. This is for management purposes only and won't affect the connection
but it has to be unique.
Examples:
* "Main Customer Support Line"
* "Sales Team Hotline"
* "Twilio Production Trunk"
* "Office PBX"
**SIP Domain**
The domain or hostname of your SIP provider. This is where the Asterisk server will send and receive SIP signaling.
Examples:
* `sip.twilio.com`
* `sip.provider.com`
* `192.168.1.100` (for local PBX)
* `my-company.sip.vonage.com`
Do NOT include `sip:` prefix or port numbers. Just the hostname or IP
address.
#### Authentication Settings
**Requires Authentication** Toggle this ON if your SIP provider requires
username and password authentication. Most commercial providers require this
for security. When enabled, two additional fields appear:
**SIP Username**
The username provided by your SIP provider for authentication. Sometimes called:
* Auth username
* SIP user
* Trunk username
* Account ID
**SIP Password**
The password provided by your SIP provider. Also known as:
* Auth password
* SIP password
* Trunk password
* Auth token
Your password is encrypted and securely stored. It's never displayed in
plain text after saving.
 ### Step 3: Review and Import
Before clicking "Import Provider", review your settings:
```yaml theme={null}
Example Configuration:
Friendly Name: "Customer Support Hotline"
SIP Domain: "sip.twilio.com"
Requires Authentication: Yes
SIP Username: "mycompany_prod_user"
SIP Password: "••••••••••••••••"
```
### Step 3: Review and Import
Before clicking "Import Provider", review your settings:
```yaml theme={null}
Example Configuration:
Friendly Name: "Customer Support Hotline"
SIP Domain: "sip.twilio.com"
Requires Authentication: Yes
SIP Username: "mycompany_prod_user"
SIP Password: "••••••••••••••••"
```
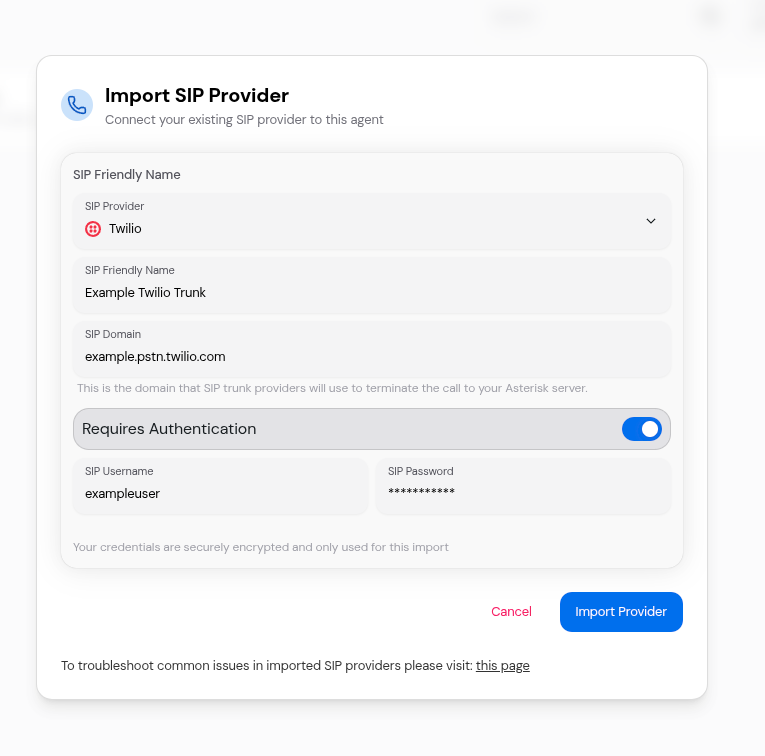 Click **"Import Provider"** to save your configuration.
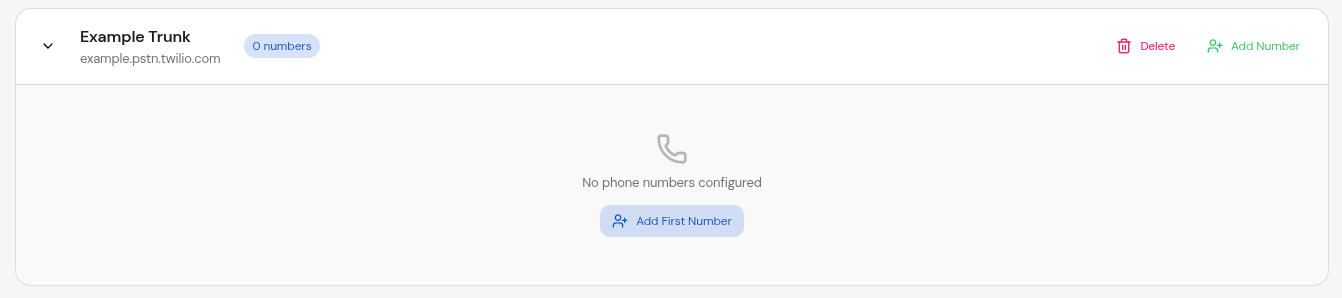
### Step 4: Verify Creation
After successful creation, you'll see:
1. A success notification confirming the provider was added
2. Your new SIP provider appears in the list
3. The provider shows 0 phone numbers initially
Click **"Import Provider"** to save your configuration.
### Step 4: Verify Creation
After successful creation, you'll see:
1. A success notification confirming the provider was added
2. Your new SIP provider appears in the list
3. The provider shows 0 phone numbers initially
 ## Configuration Examples
### Example 1: Twilio SIP Trunk
```
Friendly Name: Twilio Production
SIP Domain: mycompany.pstn.twilio.com
Requires Authentication: ✓ Yes
SIP Username: SK1234567890abcdef1234567890abcd
SIP Password: your_auth_token_here
```
## Managing Existing Providers
### Viewing Provider Details
Each SIP provider in your list displays:
* **Friendly Name**: The name you assigned to the provider
* **SIP Domain**: The provider's hostname
* **Phone Number Count**: How many numbers are configured
* **Action Buttons**: Delete and Add Number options
## Configuration Examples
### Example 1: Twilio SIP Trunk
```
Friendly Name: Twilio Production
SIP Domain: mycompany.pstn.twilio.com
Requires Authentication: ✓ Yes
SIP Username: SK1234567890abcdef1234567890abcd
SIP Password: your_auth_token_here
```
## Managing Existing Providers
### Viewing Provider Details
Each SIP provider in your list displays:
* **Friendly Name**: The name you assigned to the provider
* **SIP Domain**: The provider's hostname
* **Phone Number Count**: How many numbers are configured
* **Action Buttons**: Delete and Add Number options
 ### Expanding to View Phone Numbers
Click the chevron icon or anywhere on the provider card to expand and see all associated phone numbers.
### Expanding to View Phone Numbers
Click the chevron icon or anywhere on the provider card to expand and see all associated phone numbers.
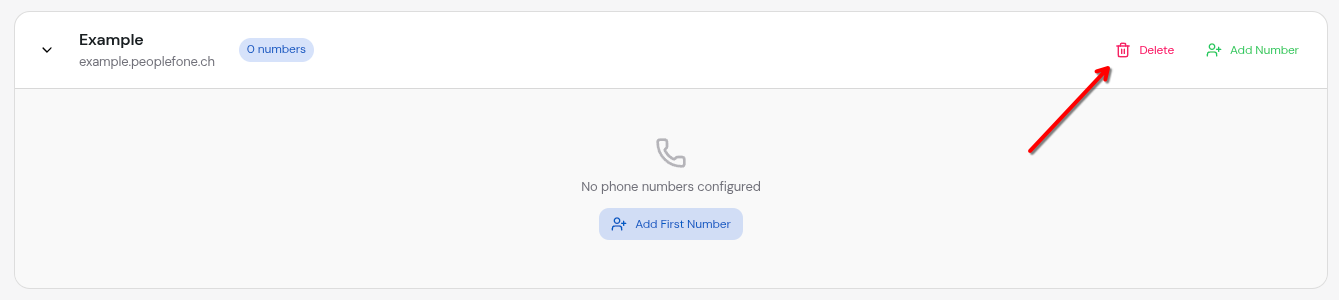
 ### Deleting a SIP Provider
Deleting a SIP provider is permanent and cannot be undone. All associated
phone numbers will also be deleted.
To delete a provider:
Click the **Delete** button (trash icon) on the provider card
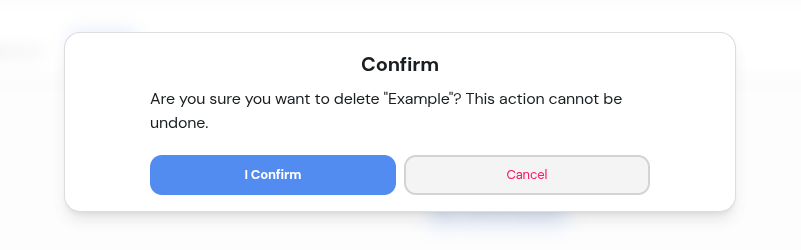
A confirmation dialog will appear. Review the warning carefully
Click **Confirm** to permanently delete the provider and all its phone numbers
### Deleting a SIP Provider
Deleting a SIP provider is permanent and cannot be undone. All associated
phone numbers will also be deleted.
To delete a provider:
Click the **Delete** button (trash icon) on the provider card
A confirmation dialog will appear. Review the warning carefully
Click **Confirm** to permanently delete the provider and all its phone numbers
 ### Editing a SIP Provider
Currently, SIP provider editing is limited. To change provider settings,
you'll need to delete and recreate the provider. Your phone number
configurations will need to be re-added.
Planned editing capabilities include:
* Updating friendly name
* Changing authentication credentials
* Modifying SIP domain
* Updating metadata
## SIP Server Information
All SIP trunks are automatically routed through Convocore's managed SIP server. You don't need to configure or manage any server infrastructure.
**Server Details:**
* **IP Address:** 134.209.121.168
* **Port:** 5060
* **Protocol:** UDP/SIP
* **Management:** Fully managed by Convocore
Simply configure your SIP provider to route calls to this address, and Convocore handles all the audio processing, routing, and AI agent connectivity automatically.
## Provider Limits
Your Convocore plan determines how many SIP providers you can configure:
Maximum number of SIP providers allowed in your workspace - **Free Plan**: 1
provider - **Pro Plan**: 5 providers - **Enterprise Plan**: Unlimited Check
your workspace settings to see your current limit.
**\[IMAGE PLACEHOLDER: Screenshot showing provider limit warning]**
*Filename suggestion: `sip-provider-limit-reached.png`*
*Description: Screenshot showing the "+ New SIP Provider" button disabled with a tooltip or message indicating the limit has been reached*
When you reach your limit, the "New SIP Provider" button will be disabled. You'll see a message:
```
Used 5 / 5 SIP Providers
```
To add more providers, either:
* Delete an unused provider
* Upgrade your plan
## Troubleshooting Provider Setup
### Common Issues
**Possible Causes:** - SIP domain is unreachable from the Asterisk server -
Incorrect authentication credentials - Provider limit reached - Network
connectivity issues **Solutions:** - Verify the SIP domain is correct and
accessible - Double-check username and password - Check your plan limits -
Contact support if issue persists
**Possible Causes:** - Network error - Provider has active calls -
Permission issues **Solutions:** - Wait for active calls to complete -
Refresh the page and try again - Check browser console for errors - Contact
support with error details
**Possible Causes:** - Wrong username or password - Credentials expired or
changed - IP whitelisting required - Authentication method mismatch
**Solutions:** - Verify credentials with your SIP provider - Check if IP
whitelisting is required - Ensure the Asterisk server IP is whitelisted -
Review your provider's authentication requirements
## Best Practices
Name your providers clearly to identify their purpose (e.g., "Customer
Support Line" instead of "Trunk 1")
Keep a record of which provider handles which phone numbers and their
purposes
Always make a test call right after adding a provider to verify it's working
Regularly check your provider's dashboard for call statistics and any issues
Never share your SIP credentials publicly or in screenshots
Consider setting up multiple providers for critical phone numbers as backup
## Security Considerations
**Security Best Practices** - Never expose your SIP credentials in public
repositories or documentation - Use strong, unique passwords for each SIP
provider - Enable IP whitelisting if your provider supports it - Regularly
rotate credentials - Monitor for unusual call patterns that might indicate
unauthorized access
### Credential Storage
Convocore securely stores your SIP credentials:
* Passwords are encrypted at rest
* Credentials are only used for SIP authentication
* They are never logged or displayed in plain text
* Access is restricted to authorized services only
## Next Steps
Once your SIP provider is configured, you're ready to add phone numbers:
Learn how to add and manage phone numbers for your SIP trunk
## Additional Resources
Configure the Asterisk server
### Editing a SIP Provider
Currently, SIP provider editing is limited. To change provider settings,
you'll need to delete and recreate the provider. Your phone number
configurations will need to be re-added.
Planned editing capabilities include:
* Updating friendly name
* Changing authentication credentials
* Modifying SIP domain
* Updating metadata
## SIP Server Information
All SIP trunks are automatically routed through Convocore's managed SIP server. You don't need to configure or manage any server infrastructure.
**Server Details:**
* **IP Address:** 134.209.121.168
* **Port:** 5060
* **Protocol:** UDP/SIP
* **Management:** Fully managed by Convocore
Simply configure your SIP provider to route calls to this address, and Convocore handles all the audio processing, routing, and AI agent connectivity automatically.
## Provider Limits
Your Convocore plan determines how many SIP providers you can configure:
Maximum number of SIP providers allowed in your workspace - **Free Plan**: 1
provider - **Pro Plan**: 5 providers - **Enterprise Plan**: Unlimited Check
your workspace settings to see your current limit.
**\[IMAGE PLACEHOLDER: Screenshot showing provider limit warning]**
*Filename suggestion: `sip-provider-limit-reached.png`*
*Description: Screenshot showing the "+ New SIP Provider" button disabled with a tooltip or message indicating the limit has been reached*
When you reach your limit, the "New SIP Provider" button will be disabled. You'll see a message:
```
Used 5 / 5 SIP Providers
```
To add more providers, either:
* Delete an unused provider
* Upgrade your plan
## Troubleshooting Provider Setup
### Common Issues
**Possible Causes:** - SIP domain is unreachable from the Asterisk server -
Incorrect authentication credentials - Provider limit reached - Network
connectivity issues **Solutions:** - Verify the SIP domain is correct and
accessible - Double-check username and password - Check your plan limits -
Contact support if issue persists
**Possible Causes:** - Network error - Provider has active calls -
Permission issues **Solutions:** - Wait for active calls to complete -
Refresh the page and try again - Check browser console for errors - Contact
support with error details
**Possible Causes:** - Wrong username or password - Credentials expired or
changed - IP whitelisting required - Authentication method mismatch
**Solutions:** - Verify credentials with your SIP provider - Check if IP
whitelisting is required - Ensure the Asterisk server IP is whitelisted -
Review your provider's authentication requirements
## Best Practices
Name your providers clearly to identify their purpose (e.g., "Customer
Support Line" instead of "Trunk 1")
Keep a record of which provider handles which phone numbers and their
purposes
Always make a test call right after adding a provider to verify it's working
Regularly check your provider's dashboard for call statistics and any issues
Never share your SIP credentials publicly or in screenshots
Consider setting up multiple providers for critical phone numbers as backup
## Security Considerations
**Security Best Practices** - Never expose your SIP credentials in public
repositories or documentation - Use strong, unique passwords for each SIP
provider - Enable IP whitelisting if your provider supports it - Regularly
rotate credentials - Monitor for unusual call patterns that might indicate
unauthorized access
### Credential Storage
Convocore securely stores your SIP credentials:
* Passwords are encrypted at rest
* Credentials are only used for SIP authentication
* They are never logged or displayed in plain text
* Access is restricted to authorized services only
## Next Steps
Once your SIP provider is configured, you're ready to add phone numbers:
Learn how to add and manage phone numbers for your SIP trunk
## Additional Resources
Configure the Asterisk server