> ## Documentation Index
> Fetch the complete documentation index at: https://docs.convocore.ai/llms.txt
> Use this file to discover all available pages before exploring further.
# Tools
# What are Tools?
Tools, also known as functions, are custom capabilities that you can add to your AI agents. They allow your agents to perform specific actions or retrieve information from external sources, greatly enhancing their functionality and usefulness.
Convocore sends parameters as a JSON array to your specified endpoint, enabling seamless integration with a wide range of automation platforms and servers. This flexibility allows you to create powerful, custom interactions between your AI agents and external systems.
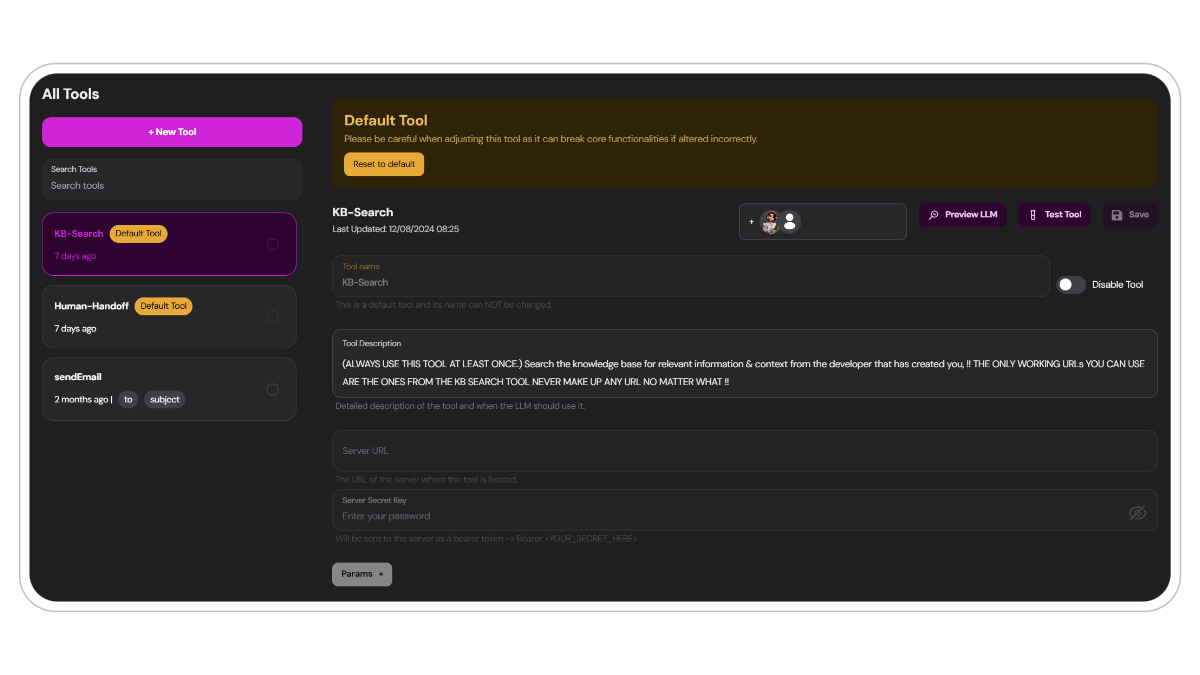 ## Default Tools
Your agents utilize the capabilities of tools right out of the box. These provide essential functionalities that form the backbone of your agents:
The knowledgebase uses a tool to query and retrieve information by default. This significantly enhances the output compared to other methods of retrieval. [Read more](/agent-creation/knowledgebase/about-the-knowledgebase).
The live-handoff is a default tool that triggers whenever a user requests a live-handoff in the chat or via the handoff popup. [Read more](/features/live-handoff).
Please be **careful** when adjusting these tools as it can break core functionalities if altered incorrectly. Do so at your own risk.
## Custom tools
Whether you need fully customized tools or prefer ready-made solutions, Convocore AI has you covered:
Implement across a **wide range** of platforms, including popular automation services like `Make.com` or `Zapier`. You can design tools for diverse functions such as data retrieval, external API interactions, or complex multi-step processes.
## Tools Setup Guide
Navigate to `Tools` either via the tab from the main menu or through an agents designer. Click on the `+ New Tool` button at the top of the page to start creating a new tool.
## Default Tools
Your agents utilize the capabilities of tools right out of the box. These provide essential functionalities that form the backbone of your agents:
The knowledgebase uses a tool to query and retrieve information by default. This significantly enhances the output compared to other methods of retrieval. [Read more](/agent-creation/knowledgebase/about-the-knowledgebase).
The live-handoff is a default tool that triggers whenever a user requests a live-handoff in the chat or via the handoff popup. [Read more](/features/live-handoff).
Please be **careful** when adjusting these tools as it can break core functionalities if altered incorrectly. Do so at your own risk.
## Custom tools
Whether you need fully customized tools or prefer ready-made solutions, Convocore AI has you covered:
Implement across a **wide range** of platforms, including popular automation services like `Make.com` or `Zapier`. You can design tools for diverse functions such as data retrieval, external API interactions, or complex multi-step processes.
## Tools Setup Guide
Navigate to `Tools` either via the tab from the main menu or through an agents designer. Click on the `+ New Tool` button at the top of the page to start creating a new tool.
 You have three options:
Design and implement a completely customized tool tailored to your specific needs. This option offers the most flexibility, allowing you to define unique functionalities that perfectly align with your use case.
When creating a custom tool, clearly define its purpose, parameters, and expected outputs.
Convocore offers a variety of pre-configured tool templates that can be easily customized to fit your needs. For example, the SendEmail template provides a foundation for email integration that you can build upon.
Preset templates are an excellent starting point for those new to tool creation or for quickly implementing standard functionalities.
Choose a clear, descriptive name for your tool. This name will be used to reference it in the agent's system prompt.
You have three options:
Design and implement a completely customized tool tailored to your specific needs. This option offers the most flexibility, allowing you to define unique functionalities that perfectly align with your use case.
When creating a custom tool, clearly define its purpose, parameters, and expected outputs.
Convocore offers a variety of pre-configured tool templates that can be easily customized to fit your needs. For example, the SendEmail template provides a foundation for email integration that you can build upon.
Preset templates are an excellent starting point for those new to tool creation or for quickly implementing standard functionalities.
Choose a clear, descriptive name for your tool. This name will be used to reference it in the agent's system prompt.
.png?fit=max&auto=format&n=YDOB1G28XgxvIwqF&q=85&s=7606ef9da33ae79e4f59c671c00ab850) Before your tool can talk with an external service. You need to set up the necessary information:
Find the endpoint **URL** from where your tool is hosted. In Make.com this is found by going to the webhooks tab and selecting your chosen endpoint.
Then Copy the Webhook URL, looks like this: [https://hook.eu2.make.com/fws5j13b27tq93nrpfjeowejrpwewfj](https://hook.eu2.make.com/fws5j13b27tq93nrpfjeowejrpwewfj)
**Remember** to run a test to make sure your scenario or endpoint works. More on testing below.
Get the `Authentication key` from where your tool is hosted. In Make.com this is found by going to the webhooks tab and selecting your chosen endpoint.
Copy the Webhook **UDID**. It will look something like this: `fws5j13b27tq93nrp0kinqy926mo4277`
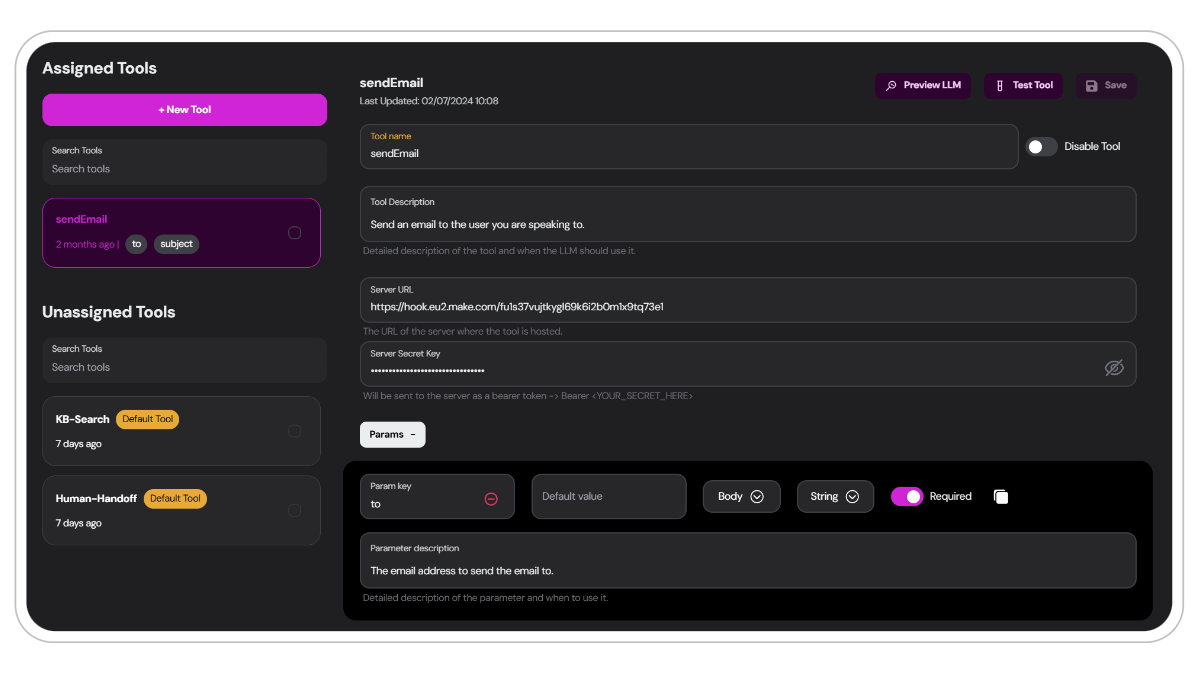
A brief, clear explanation of what the tool does.
This description is fed to the LLM every time the tool is used. Make sure its clear and easy to interpret for the model.
```markdown Email tool description: theme={null}
Send an email to the user you are speaking to.
```
Specify the parameters your tool needs to function:
Before your tool can talk with an external service. You need to set up the necessary information:
Find the endpoint **URL** from where your tool is hosted. In Make.com this is found by going to the webhooks tab and selecting your chosen endpoint.
Then Copy the Webhook URL, looks like this: [https://hook.eu2.make.com/fws5j13b27tq93nrpfjeowejrpwewfj](https://hook.eu2.make.com/fws5j13b27tq93nrpfjeowejrpwewfj)
**Remember** to run a test to make sure your scenario or endpoint works. More on testing below.
Get the `Authentication key` from where your tool is hosted. In Make.com this is found by going to the webhooks tab and selecting your chosen endpoint.
Copy the Webhook **UDID**. It will look something like this: `fws5j13b27tq93nrp0kinqy926mo4277`
A brief, clear explanation of what the tool does.
This description is fed to the LLM every time the tool is used. Make sure its clear and easy to interpret for the model.
```markdown Email tool description: theme={null}
Send an email to the user you are speaking to.
```
Specify the parameters your tool needs to function:
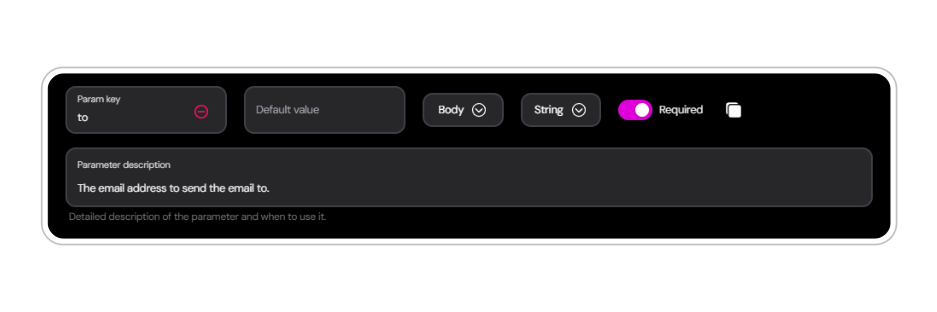 ### Input options for parameters
Each parameter has a set of values that needs to be filled in correctly for the tool to work:
The name of the parameter **(e.g., "to", "subject", "html")**. Make this short and descriptive, this makes it easier for the LLM to interpret.
An optional preset value for the parameter. Neat if you want a fixed parameter for every tool use. You can also set the parameter as `required`. The LLM will take this into consideration when collecting data from the user.
Make sure to define the type of data your parameter will contain and where it will be placed in the request:
(e.g., String, Number, Boolean)
Whether the parameter is a part of the Header or Body of the request.
Want to learn more about APIs? Check out [this article](https://www.postman.com/what-is-an-api/) from Postman.
Just like the tools description, this explains the parameter and specifies the data it should include and when to use it. Write **clear** and **detailed** descriptions for optimal LLM interpretation.
```markdown Example description of 'subject' param: theme={null}
The subject of the email.
```
After configuring your tool, make sure to `save`.
## Testing Your Tools
Testing your tools in a **controlled environment** before going live is crucial. It's essential to understand how the webhook processes data and how the models behave when using a tool. This ensures that every user or client can send and receive requests seamlessly.
#
You can test the tool's webhook with random **pre-filled data** in the parameters or fill in the parameters yourself. This is particularly useful when setting up automations and verifying functionality before implementing to the agents LLM.
### Input options for parameters
Each parameter has a set of values that needs to be filled in correctly for the tool to work:
The name of the parameter **(e.g., "to", "subject", "html")**. Make this short and descriptive, this makes it easier for the LLM to interpret.
An optional preset value for the parameter. Neat if you want a fixed parameter for every tool use. You can also set the parameter as `required`. The LLM will take this into consideration when collecting data from the user.
Make sure to define the type of data your parameter will contain and where it will be placed in the request:
(e.g., String, Number, Boolean)
Whether the parameter is a part of the Header or Body of the request.
Want to learn more about APIs? Check out [this article](https://www.postman.com/what-is-an-api/) from Postman.
Just like the tools description, this explains the parameter and specifies the data it should include and when to use it. Write **clear** and **detailed** descriptions for optimal LLM interpretation.
```markdown Example description of 'subject' param: theme={null}
The subject of the email.
```
After configuring your tool, make sure to `save`.
## Testing Your Tools
Testing your tools in a **controlled environment** before going live is crucial. It's essential to understand how the webhook processes data and how the models behave when using a tool. This ensures that every user or client can send and receive requests seamlessly.
#
You can test the tool's webhook with random **pre-filled data** in the parameters or fill in the parameters yourself. This is particularly useful when setting up automations and verifying functionality before implementing to the agents LLM.
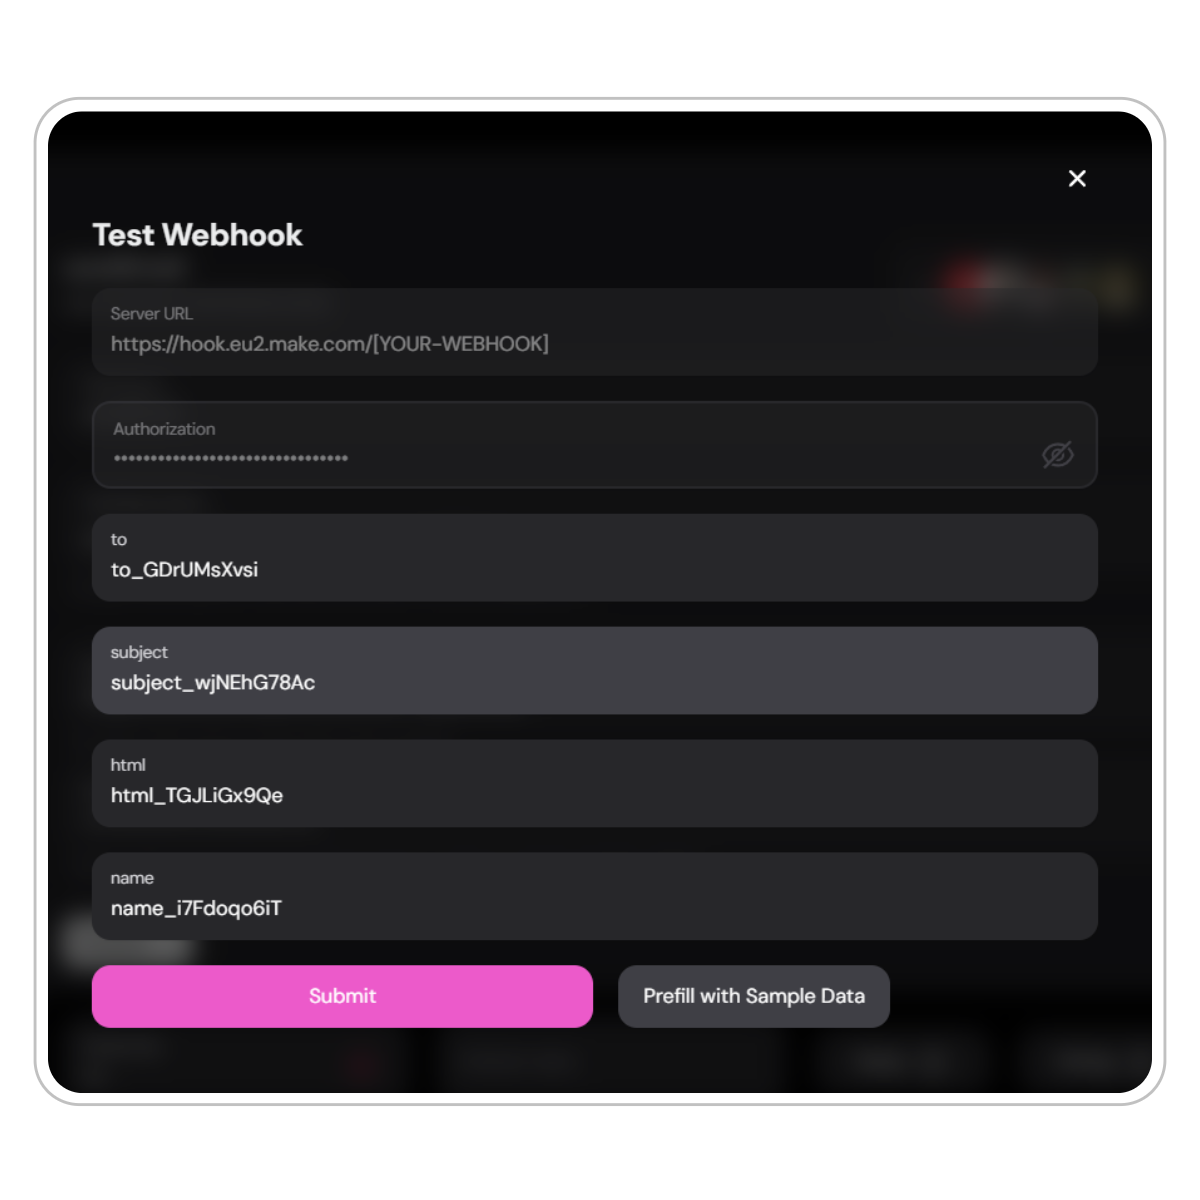 **Syntax Error:** As shown in the video, you may still see an error even when Make receives the payload successfully. If the webhook still does not behave as expected, contact [support@convocore.ai](mailto:support@convocore.ai).
### Using Preview LLM
Convocore offers a powerful "Preview LLM" feature for thorough tool testing before deployment.
Navigate to your agent's dedicated tools page, select the tool you want to test and click `Preview LLM`.
Set the maximum retrievable chunks to control information access.
Choose from compatible AI models (look for the tools checkmark).
Input specific prompts to test your tool's functionality. Different models may require tailored prompts depending on your system prompt. Here are some examples of how to test your tool in one interaction:
```markdown Claude Models theme={null}
Send an email to [email] and name [name] by using SendEmail tool, send it right away and be creative.
```
```markdown GPT Models theme={null}
Send a creative email to [email] right away.
```
Analyze the debug output to see how the LLM interacts with your tool and the final results.
Remember to `assign` the tool to your agent **before** testing. Unassigned tools won't be available in the preview or from the widget. Do it from the tools menu or assign it directly from your agents tool tab.
## Tools and System Prompt
When your tool is tested and ready to implement, your agent wont know when or exactly how to use it. This is where the system prompt comes into play where you instruct the agent on how it should use, which information it should collect and when it should use the tool.
### Example Prompt for Tools
Here are some examples of how you can instruct your agent to use tools in various scenarios:
```markdown Lead Generation theme={null}
You have access to a tool called 'addLeadToCRM'. When a user expresses interest in our products or services, use this tool to add their information to our CRM system. The tool requires the following parameters:
- name: The full name of the lead
- email: The lead's email address
- interest: A brief description of what they're interested in
Always confirm with the user before adding their information to the CRM.
```
```markdown Fitness Planning theme={null}
You have access to two tools: 'createTrainingPlan' and 'createMealPlan'. Use these tools when users ask for fitness advice.
For 'createTrainingPlan', you need:
- fitnessLevel: beginner, intermediate, or advanced
- goal: e.g., weight loss, muscle gain, endurance
- daysPerWeek: number of training days
For 'createMealPlan', you need:
- dietType: e.g., vegetarian, keto, balanced
- calorieTarget: daily calorie goal
- allergies: list of any food allergies
Gather this information from the user before using the tools.
```
```markdown Appointment Booking theme={null}
You have a 'scheduleAppointment' tool. Use this when users want to book a meeting or appointment. The tool needs:
- customerName: Full name of the customer
- serviceType: Type of service or meeting requested
- preferredDate: User's preferred date (format: YYYY-MM-DD)
- preferredTime: User's preferred time (format: HH:MM)
After scheduling, always confirm the details with the user.
```
```markdown Newsletter Subscription theme={null}
When you have successfully answered a user query or if the user express interest in subscribing to the newsletter, use the 'subscribeNewsletter' tool. It requires:
- email: User's email address
- name: User's full name
- interests: Comma-separated list of topics they're interested in
Always ask for explicit consent before subscribing a user.
```
#
{/* ## Explore the Marketplace
Choose from a wide range of resources including pre-configured agent templates, custom tool bundles with automations and instructions, Make.com automations with ChatGPT and other popular modules and so much more!
Marketplace offerings can significantly speed up your development process and provide inspiration for advanced use cases. You can download Make.com automations and upload them to your own Make account for seamless integration.
*/}
#
## Conclusion
Tools are a powerful feature in Convocore that can significantly enhance your AI agents' capabilities. By following this guide and best practices, you can create and integrate tools that allow your agents to perform a wide range of actions, making them more versatile and valuable to your users.
**And Remember:** The key to successful tool implementation is clear communication between your system prompt, the AI agent, and the tool itself. Well-defined parameters and clear instructions will lead to smooth and effective tool usage.
**Syntax Error:** As shown in the video, you may still see an error even when Make receives the payload successfully. If the webhook still does not behave as expected, contact [support@convocore.ai](mailto:support@convocore.ai).
### Using Preview LLM
Convocore offers a powerful "Preview LLM" feature for thorough tool testing before deployment.
Navigate to your agent's dedicated tools page, select the tool you want to test and click `Preview LLM`.
Set the maximum retrievable chunks to control information access.
Choose from compatible AI models (look for the tools checkmark).
Input specific prompts to test your tool's functionality. Different models may require tailored prompts depending on your system prompt. Here are some examples of how to test your tool in one interaction:
```markdown Claude Models theme={null}
Send an email to [email] and name [name] by using SendEmail tool, send it right away and be creative.
```
```markdown GPT Models theme={null}
Send a creative email to [email] right away.
```
Analyze the debug output to see how the LLM interacts with your tool and the final results.
Remember to `assign` the tool to your agent **before** testing. Unassigned tools won't be available in the preview or from the widget. Do it from the tools menu or assign it directly from your agents tool tab.
## Tools and System Prompt
When your tool is tested and ready to implement, your agent wont know when or exactly how to use it. This is where the system prompt comes into play where you instruct the agent on how it should use, which information it should collect and when it should use the tool.
### Example Prompt for Tools
Here are some examples of how you can instruct your agent to use tools in various scenarios:
```markdown Lead Generation theme={null}
You have access to a tool called 'addLeadToCRM'. When a user expresses interest in our products or services, use this tool to add their information to our CRM system. The tool requires the following parameters:
- name: The full name of the lead
- email: The lead's email address
- interest: A brief description of what they're interested in
Always confirm with the user before adding their information to the CRM.
```
```markdown Fitness Planning theme={null}
You have access to two tools: 'createTrainingPlan' and 'createMealPlan'. Use these tools when users ask for fitness advice.
For 'createTrainingPlan', you need:
- fitnessLevel: beginner, intermediate, or advanced
- goal: e.g., weight loss, muscle gain, endurance
- daysPerWeek: number of training days
For 'createMealPlan', you need:
- dietType: e.g., vegetarian, keto, balanced
- calorieTarget: daily calorie goal
- allergies: list of any food allergies
Gather this information from the user before using the tools.
```
```markdown Appointment Booking theme={null}
You have a 'scheduleAppointment' tool. Use this when users want to book a meeting or appointment. The tool needs:
- customerName: Full name of the customer
- serviceType: Type of service or meeting requested
- preferredDate: User's preferred date (format: YYYY-MM-DD)
- preferredTime: User's preferred time (format: HH:MM)
After scheduling, always confirm the details with the user.
```
```markdown Newsletter Subscription theme={null}
When you have successfully answered a user query or if the user express interest in subscribing to the newsletter, use the 'subscribeNewsletter' tool. It requires:
- email: User's email address
- name: User's full name
- interests: Comma-separated list of topics they're interested in
Always ask for explicit consent before subscribing a user.
```
#
{/* ## Explore the Marketplace
Choose from a wide range of resources including pre-configured agent templates, custom tool bundles with automations and instructions, Make.com automations with ChatGPT and other popular modules and so much more!
Marketplace offerings can significantly speed up your development process and provide inspiration for advanced use cases. You can download Make.com automations and upload them to your own Make account for seamless integration.
*/}
#
## Conclusion
Tools are a powerful feature in Convocore that can significantly enhance your AI agents' capabilities. By following this guide and best practices, you can create and integrate tools that allow your agents to perform a wide range of actions, making them more versatile and valuable to your users.
**And Remember:** The key to successful tool implementation is clear communication between your system prompt, the AI agent, and the tool itself. Well-defined parameters and clear instructions will lead to smooth and effective tool usage.